NOTE: This page is for an older version of wfview (v1.1). For the current version, please see this page.
This page is here for archival purposes.
Before launching wfview, it is important to make sure the radio is set up properly.
Radio Settings:
For network access radios (IC-9700, IC-7850, IC-7610, IC-705), make sure that the network is set up (SET > Network), and that Network Control is On. You’ll also need a “User1” ID and a User1 password. Take note of the Control Port (UDP) value, which is by default 50001. Also note the IP address of the radio. Lastly, you must enable CI-V Transceive (SET > Connectors > CI-V). Many other programs will send commands to disable CI-V transceive, so keep an eye on it.
For serial port access radios (IC-7300 and basically any radio connected with USB or with a serial port), you will need to set the CI-V “Unlink from [REMOTE]” to (SET > Connectors > CI-V) true. Next, set the “CI-V USB Baud Rate” to 115200 (required for spectrum access). Finally, enable the “CI-V Transceive” option, which provides wfview with a telemetry stream from the radio.
wfview Settings:
wfview is designed to be simple and intuitive. Common controls are on the “View” tab, which is what the program shows when it opens. When you first open wfview, it will attempt to find and use a rig connected via USB (serial). If you don’t see your rig, or your rig uses a network connection, you’ll need to enter it in on the Settings tab. Note that the user doesn’t need to specify the rig model number or CI-V address — wfview will auto-discover this information.
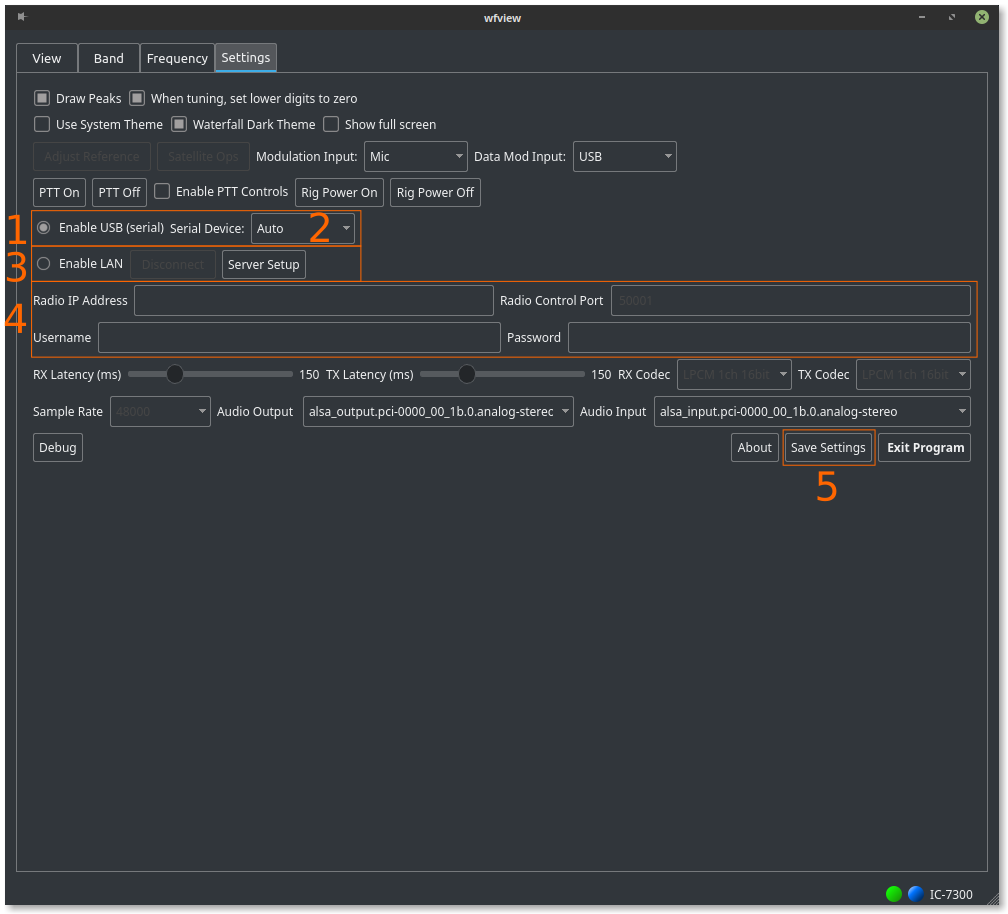
On the settings tab, you can select from [1]”Enable USB (serial)” or [3]”Enable LAN”.
Use the “Enable USB (serial)” option if the rig is connected directly to your computer via a USB cable. You can then select the USB serial device fro the combo menu to the left [2], or specify one manually if needed. For most cases, wfview will find the port connected to an icom radio automatically. Do note, that your account must have permission to access the port. If the connection is successful, make sure to press [5]”Save Settings” for future use.
If you’re accessing the radio over network connection, select [3]”Enable LAN“. Note that you must first enable Network Control on the radio. Next, enter [4] in the Radio’s IP address (or hostname), Radio control port (the default is 50001), Username, and Password (as set on the rig’s screen). The remaining controls for latency and sources should be left at their default values. Press “Connect”, and if the connection is successful, make sure to press [5]”Save Settings” for future use.
Once connected, you’ll probably want to go back to the View tab. From here, the radio may be adjusted as per the many controls found on the page.