wfview has a built-in radio server. This guide will help you configure the built-in server, which you can use to remotely access radios which lack a built-in server.
At this time, the built-in server functionality of wfview only supports Icom radios. We do plan to support other brands in the future.
Scope
This article only applies to USB and Serial radios. For radios with built-in ethernet or wifi, simply connect wfview to the radio’s ip address. See the Getting Started chapter. So, to be clear, this article and the entire “Radio Server” page are not needed if your radio already has a network connection.
The most commonly used radio with this setup is the IC-7300, but many older rigs will work great with the wfview built-in server, which handles getting full-duplex audio and control over the network.
wfview’s built-in server handles the radio’s controls as well as full-duplex audio. Simply run one copy of wfview on a server computer, which can be anything from a humble Raspberry Pi to a full desktop PC, and run a second copy of wfview on your remote computer or laptop. The controls are very responsive and audio latency is generally under 75ms (LAN) or under 200ms (WAN). The normal graphical wfview program you’re familiar with has the server capability already. With this method, there is no “screen sharing” or “remote desktop” or “VNC”. One copy of wfview connects over IP to the other copy of wfview.
Concept

To remotely operate a radio, you will need to run one copy of wfview on a computer connected to the radio with a USB cable (or other appropriate cables). It can be a small, single-board computer like a Raspberry Pi, or a normal desktop computer. Currently, a desktop environment is required, but a command-line server version will eventually be made available. Once connected and configured, client computers running wfview can connect over the network (internet or LAN) to the computer hosting the radio.
Server Setup
For the server computer, begin by installing wfview. Connect the radio, and then launch wfview. Don’t forget to disable sleep — you want the server to always be available for remote connection.
Follow the Getting Started guide for serial port radios. Make sure, on the radio, that CI-V Transceive is turned on.
Once wfview is running and properly controlling the rig, head over to the Settings tab of wfview, and click on the “Radio Server” page.
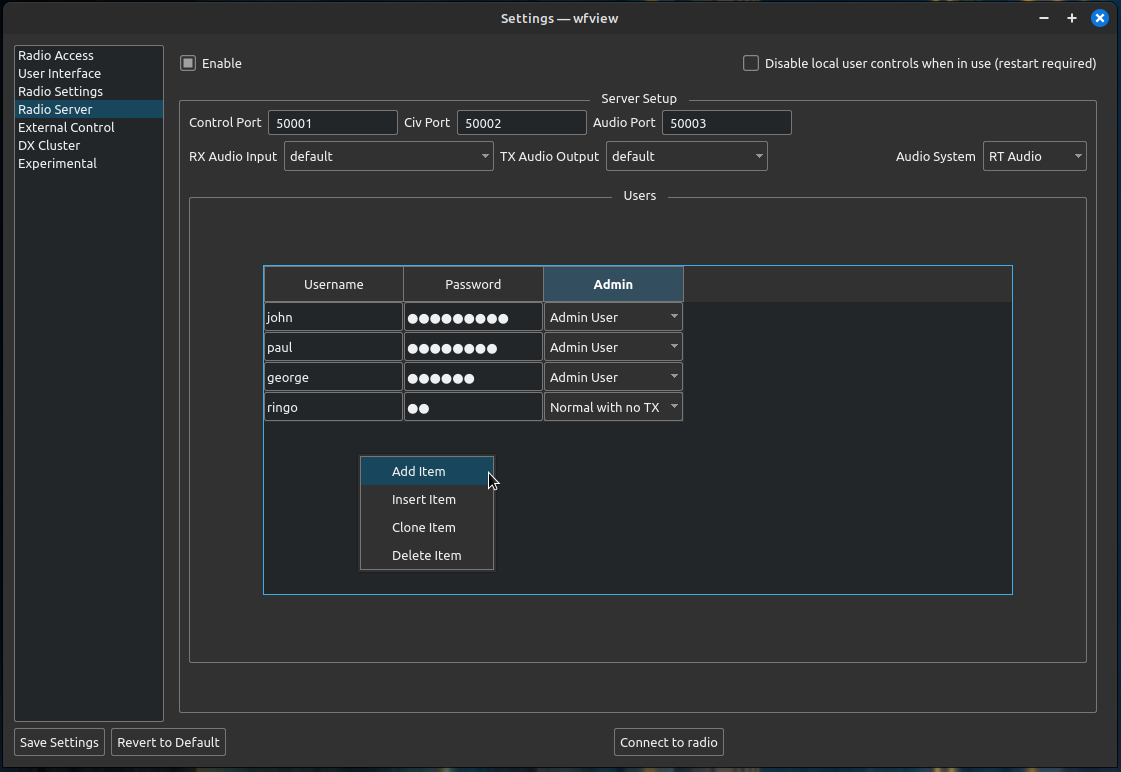
The standard ports, as shown in the screenshot, are 50001, 50002, and 50003. You should use these ports unless you have a reason to use something else.
Select the radio’s receive audio device under “RX Audio Input”, and select the radio’s transmit audio device under “TX Audio Output”. If these drop-down menus are grayed out, it means that wfview has not connected to the radio yet; head over to Radio Access and make sure the Serial port has been set up correctly and then press “Connect to Radio”.
Under Linux, these two names (or similar names) should work for the server audio on the IC-7300:
- Audio Input:
alsa_input.usb-Burr-Brown_from_TI_USB_Audio_CODEC-00.analog-stereo - Audio Output:
alsa_output.usb-Burr-Brown_from_TI_USB_Audio_CODEC-00.analog-stereo
Generally speaking, on Windows, the audio device will say “USB Audio CODEC” in the name and often also “Burr-Brown”. Remember, you are looking for a USB device. If you see many USB Audio CODEC devices, try unplugging other USB audio devices and any other radios, and then re-launch wfview and see if you see fewer, it may help.
The Audio System should generally be set to “Qt Audio” unless there are problems with this audio system. Note that you cannot change the audio system once a client is connected; therefore, it is necessary to make sure all clients are disconnected prior to changing the audio system.
Next, define a username and password for a “Full User” account. As of wfview 1.5, user privileges are not enforced, but it is something we may do in the near future. Since the passwords are not well-encrypted, do not use a sensitive password.
If you are satisfied with the settings, press “Save Settings” and then re-check the “Enable” checkbox to turn on the server. You should see “udp.server: starting udp server” in the Log window. You should also see a message about the Audio Input and Audio Output devices; make sure they match your settings.
Check the “Disable local controls” checkbox to lower unnecessary radio polling from the server and create a more responsive experience.
At this point, server setup is complete.
Client Setup
setting up a second computer to connect to your wfview server is simple. Launch wfview on the second computer, and follow the Getting Started guide. For the radio connection type, specify “Network”. Supply the ip address of your wfview server computer for the Hostname, along with the same control port (50001 by default), username, and password.
For the TX and RX Codec, “Opus 1ch” is the recommended choice, as it uses about 4 to 10 times less bandwidth than the 16-bit PCM formats. Note that Opus will only work if you are running a wfview server; it is a special benefit of this software. For VPN users, you will likely need to use an 8-bit format such as “8-Bit uLaw” due to typical VPN packet mangling. The uLaw codec uses logarithmic bit spacing and provides surprisingly good quality.
The audio devices should be chosen for your client computer, typically a headset or speakers. Use the Qt Audio system unless you have problems with it. If you need to loop audio into a second program such as wsjt-x or fldigi, read our audio configuration page.
Most of the details for these controls and options are covered in the Settings manual page.
Radio Settings
Your radio needs to be told to source audio from the USB or ACC connector, as applicable to your setup, so head over to the Radio Settings page of the Settings Tab, and select the audio interface that the radio should use for transmit audio. IC-7300 users should select “USB”. Older radios, lacking a USB port, will likely be connected to the computer using an ACC adapter. Some older radios do not have a command for changing the input, so the input must be changed using buttons on the radio.
See this page for details.
Router Setup
To access wfview from outside your home network, you will need to port forward UDP traffic on the three ports mentioned above. Important: DO NOT map the ports to any other port numbers. They must be the same port on the router and the computer running wfview server. This is because the port numbers are a part of the communication protocol itself.
Troubleshooting
Running a server is an inherently tricky task, and it is even more difficult when streaming audio is involved! You will need to be familiar with concepts such as TCP/IP and be comfortable with topics like finding your ip address.
Audio
There are three places to look: Radio audio settings (input selection, AF gain, Mic gain, etc), Server (TX and RX audio source/sink selection), and Client (mic and speaker connection). The best strategy is to begin with a simple USB headset on the client. You can enable TxAudio as a type of secondary meter and you should be able to see the raw headset audio on the meter even when receiving. If you don’t see it, adjust the gain for the headset using your operating system’s audio settings control panel. On the server, make sure the right audio devices are not only selected in the GUI but also being ultimately used by the server. The server audio modules will load upon the first client connection, and you should see this in the log (press “Log”). Check what device is being used. Radio devices are generally easy to spot. Linux users may try this script to list serial and audio devices.
Connecting
First, make the connection between two computers on the same LAN. This will eliminate router configuration and port forwarding from your initial attempts.
Make sure you can ping from one computer to the other. Verify the IP address of the server. Check the log on the server (press the Log button). See if you can see the remote login activity.
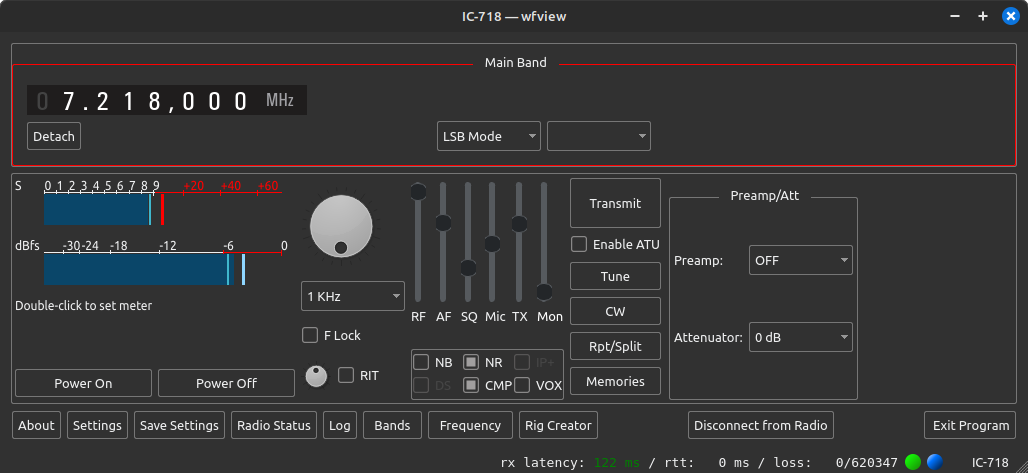
Here is a screenshot of an IC-718 accessed via the internet: