NOTE: This is for wfview version 1.64
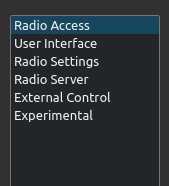
The Settings tab has several “pages” of settings:
Each page contains categories of settings. The settings are saved in a format detailed here.
Quickly jump to each page:
Radio Access, User Interface, Radio Settings, Radio Server, External Control, Experimental
Radio Access
Under Radio Access are controls relating to how wfview access your radio:
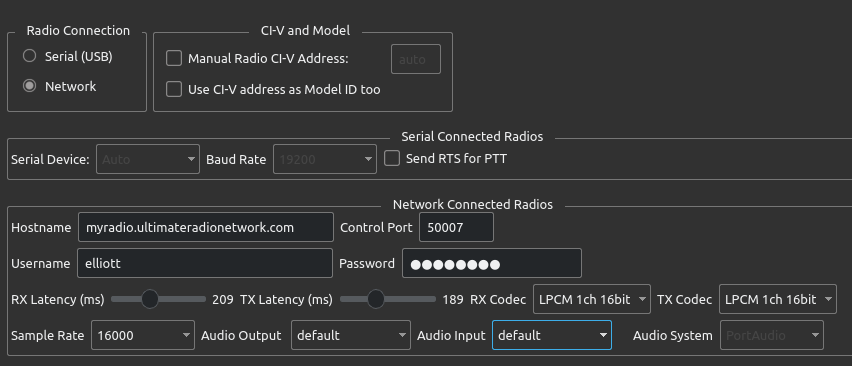
Radio Connection:
- Serial (USB): Select this option if your radio connects to this computer using a Serial port, USB port, or Serial CI-V USB adapter.
- Network: Select this option if you are accessing your radio over a network
CI-V and Model:
These controls should not be used except for very old radios that do not support CI-V Radio ID queries or for unusual circumstances. wfview automatically figures out the CI-V address and model number for most radios. Don’t forget to turn on CI-V Transceive, as we use that feature to automatically find your radio.
- Manual Radio CI-V Address: Check this box to manually set the radio’s CI-V address. The input format is hex, which is the same as the radio’s menu and documentation. For example, if you have an Icom IC-756 Pro, enter “5C” here for the default CI-V address on this model. We recommend not checking this box unless absolutely necessary. Enable CI-V Transceive on your radio instead.
- Use CI-V address as Model ID too: Check this box to cause wfview to infer the radio’s capabilities by assuming the provided CI-V address is the same as the model number. This is needed on older radios that do not respond to Radio ID queries (command 0x19 0x00). Set the radio to the default CI-V address and enter it in as a manual address above. This is not needed on most radios made after the IC-718 (late 90s). Just enable CI-V Transceive on the radio and leave this unchecked.
- Usage Tip: You can also use these two boxes to cause a radio to masquerade as a different model, which is useful if wfview doesn’t have support for your radio but you know that the capabilities are similar enough to another model. Simply set the radio’s CI-V address on the radio to the default address of a supported model, and then enter this address in manually in wfview, and check the “Use CI-V address as Model ID too” box.
Serial Connected Radios:
- Serial Device: Select the serial device entry here. On Linux, “Auto” will automatically select OEM Icom radios with built-in USB ports. Use “Manual” if you need to manually enter a port that isn’t on the list (for example, if you are using a mysterious serial port)
- Baud Rate: Select the radio’s baud rate. It’s recommended to set the radio to the highest-supported baud rate unless there are problems. For the IC-7300, you must set the baud rate to 115200 in order to get spectrum data.
- Send RTS for PTT: check this box if the radio does not have a PTT command. This will cause wfview to toggle the RTS serial line to indicate PTT, which is supported on many rig interface boxes. wfview will intercept any PTT command from external programs and toggle the RTS as well.
- Tip: Linux users can automatically set useful names for USB serial devices with reasonable default permissions. See this page on how to do it.
Network Connected Radios:
- Hostname: Type in the radio’s (or radio server’s) IP address or hostname here.
- Control Port: Type in the radio’s control port here. The default value is 50001. The other ports used will be ascertained via the control channel automatically.
- Username: Type in the user name as is set on the remote radio here.
- Password: Type in the password as is set on the remote radio here.
- RX Latency (ms): This is the size of the receive audio buffer, in milliseconds. Larger values are needed for less-stable connections.
- TX Latency (ms): This is the size of the transmit audio buffer, in milliseconds. Larger values are needed for less-stable connections. Tip: Set the RX latency control to the lowest value and advance until there are no dropouts. Advance about 20ms further, and then set the TX Latency to the same value.
- RX Codec and TX Codec: These select the codec for the audio going to and from the radio:
- LPCM 1/2 ch 16bit: PCM Lossless encoding, one (or two) channel, 16-bits per sample
- LPCM 1/2 ch 8 bit: PCM Lossless encoding, one (or two) channel, 8-bits per sample
- uLaw 1/2 ch 8 bit: Logarithmic bit space 8-bit per sample. This is a higher-quality format than LPCM 8-bit, but still has the advantage of only needing 8 bits per sample.
- Opus: This is a high-quality perceptually-lossless (but technically lossy) format, which provides a 4:1 reduction in audio bandwidth. Opus is only supported when the radio server is another computer running a wfview server, or the Xiego X6100. Opus is the recommended choice when the other side is wfview. If selected on an unsupported direct-to-radio connection, wfview will default back to LPCM 16 bit.
- Tip: Some VPNs and ISPs re-order and mangle UDP packets, causing 16-bit packets to get split. Using uLaw 8 bit or Opus will solve this problem.
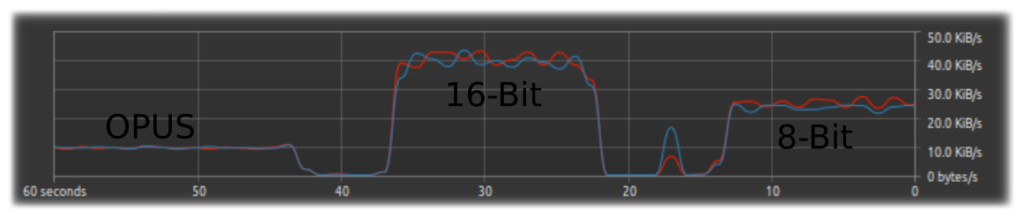
Here is a graph showing the network bandwidth in kilobytes per second required for the Opus codec, 16-bit LPCM, and 8-Bit LPCM (same as 8-bit uLaw). Each was taken with a 1-channel format with a sample rate of 16 KHz:
- Please note, the audio configuration cannot be changed while connected to a radio; please press “Disconnect from Radio” prior to making changes.
- Sample Rate: Select the desired sample rate here. Remember, the audio will never exceed half the sample rate. For example, using 16 KHz as a sample rate will limit the audio to just under 8 KHz, but will also require only 1/3rd the bandwidth of a 48 KHz sample rate connection. Lowering the sample rate is an excellent way to reduce network bandwidth. Values below 16 KHz may sound a bit lower in quality, but at 16 KHz and above is generally favorable. wfview takes care of converting the audio for your computer’s hardware sample rates.
- Audio Output: Select your computer’s speakers or headset speakers here. Some platforms will provide a “default” device, which is generally acceptable.
- Audio Input: Select your computer’s microphone or headset microphone here. Again, some platforms provide a “default” device.
- Audio System: This lets you select from the three available audio systems. The differences between the different systems can include latency, device sharing, and reliability. To change audio systems, first disconnect from the radio, select an audio system, and then, very important, re-visit the Audio Input and Audio Output combo boxes. Do not forget to click on these boxes and make sure to re-select the device. The devices tend to get re-ordered and renamed, so it is worth clicking and reading all the available choices each time. Once selected, you can then re-connect to the radio.
- Qt Audio: This is the default choice and should work on all platforms.
- Port Audio: This system may provide a more consistent stream of audio for some users.
- RT Audio: For some people, this is a lower-latency choice
- Tip: If your current audio system works, just leave this alone and don’t worry about it :-).
User Interface
These settings determine many aspects of the interface and user experience in wfview.
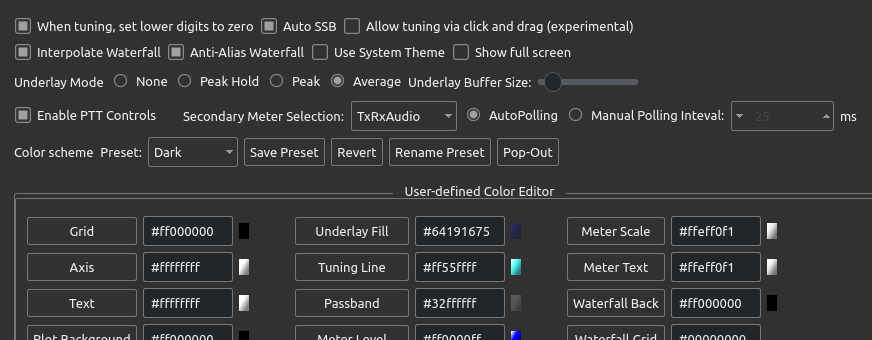
- When tuning, set lower digits to zero: This control causes the tuning dial to automatically set the below-tuning-step digits to zero. This is generally desired. Uncheck this control if you want to dial in and keep an offset applied to all your tuning, for example if you want frequencies always ending in 5 KHz for some reason.
- Auto SSB: This setting will automatically select the “correct” sideband when switching frequencies. This is only done if you are already in LSB or USB mode, and only if you change frequencies using the Frequency tab (or hit the star/asterisk key).
- Allow tuning via click and drag: This checkbox made it into the master branch accidentally. If enabled, you can try clicking and dragging on the spectrum to tune. It is an experimental option and still under development.
- Interpolate Waterfall: If you have a big screen, check this box and the pixels of the waterfall will not look quite as blocky and pixelated. Checking this box can add significant CPU use, so do not do this on a humble platform like a Raspberry Pi.
- Anti-Alias Waterfall: Check this box for anti-aliasing on the waterfall display. This seems to have almost no impact on the performance or appearance! But it’s an option if you want it.
- Use System Theme: Check this box to switch from wfview’s built-in theme (QDarkStyleSheet) to your desktop environment’s default appearance. Read more about this here.
- Show full screen: Check this box for full-screen mode. You can also use F11 to toggle full screen. Tip: For a dedicated wfview display, use a raspberry pi set to launch wfview on startup under the default user. Check the full screen box and save the settings.
- Underlay Mode: These four options select an “underlay” for the spectrum plot. The underlay is an additional plot shown under the radio’s spectrum data. Two of the underlay options obtain data from a variable-size buffer of received spectra, in which one value is deleted each time a new value is received. The size can be set using the buffer size slider. The available underlay options are:
- None: no underlay drawn
- Peak Hold: An underlay is drawn showing the maximum value received. The peaks do not expire except when tuning.
- Peak: A buffered peak mode. The peak value in the buffer (as set with the Buffer Size slider) is plotted for each frequency.
- Average: The average value for each frequency is plotted. This provides a “smoothed” spectrum mode which often helps beat down broad-band noise such as RFI.
- Underlay Buffer Size: Sets the size of the underlay buffer. Lower values will be more responsive, higher values will be more “sticky”. Tip: Press “Pop-Out” to see the effects of adjusting this slider in real-time as you make the adjustments.
- Enable PTT Controls: Enables wfview’s transmit button. This checkbox has no effect on the radio’s physical PTT buttons, nor does it block any other radio control programs from sending PTT commands. It is designed to prevent inadvertent transmission, and could be useful during open radio demonstrations. wfview has a built-in 3 minute timeout on transmit.
- Secondary Meter Selection: Select a desired secondary meter here. Some radios do not support some meter types.
- Available meters: None, SWR, ALC, Compression, Voltage, Current, Center (IC-R8600 only), TxRxAudio (switches Tx/Rx automatically), RxAudio (RX audio all the time), TxAudio (TX audio all the time)
- See more about the meter under the View Tab manual page.
- Polling: wfview automatically determines the optimal polling rate for the radio. However, faster polling will make the meters more responsive and is generally fine so long as a secondary program isn’t polling as well. Slower polling rates may increase reliability, especially with older radios using single-wire CI-V. If you are running wfview as a server as well, it can make sense to set the polling period to a high value on the server so that the server isn’t contributing much to the overall polling activity.
Color Scheme:
Use these controls to adjust the color scheme. Pressing “Pop-Out” will let you see the color scheme changes as you are working on them. More information on customizing the appearance is available here.
- Preset: This control is for recalling the five available color scheme presets. Presets are saved with the settings and may be renamed and reverted.
- Save Preset: This button will save the selected preset’s colors and name to the settings file.
- Revert: Press this button to revert the selected preset to the default values.
- Rename Preset: Press here to rename the selected preset. Names may be up to ten characters long and may contain spaces and probably even unicode characters.
- Pop-Out: Read carefully, Jumangi players. Pressing this button pops the Settings tab out into a separate window. This will let you see the changes you are making on the View tab. When you are done making changes, you must press the button a second time to re-dock the Settings window back into a tab. The button will say “re-attach” in this state, and the pop’d out Settings window cannot be closed until you press this button. The first player to reach the golden city and yell Jumangi wins.
User-Defined Color Editor
Use these buttons to change the colors of many of the user-interface elements of wfview. The color editor allows a custom color to be selected. Simply press the button for a given attribute (such as “Grid”, “Axis”, “Text”, etc) and the color picker will be shown:
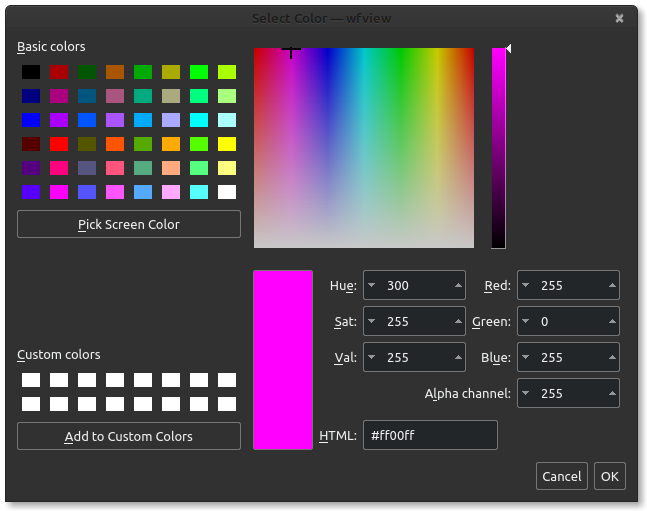
The color can then be previewed. Important: It is easy to accidentally set the Alpha channel to a low (transparent) value and not realize it, since the picker does not demonstrate the transparency. So be mindful. On the other hand, you can set an element to fully transparent (value 0) to completely hide it. wfview will warn the user if a color is set to fully transparent, but it is fine to do so.
You can also simply type in an HTML-style color in the text boxes. The format is #AARRGGBB, where AA is the transparency (00 for fully transparent, ff for fully opaque), RR is red, GG is green, and BB is blue. The “#” is optional and will be added automatically. Don’t forget to save the preset you just worked on, otherwise it will be gone next time you open wfview.
Radio Settings
These settings are convenience functions to help with radio operation.
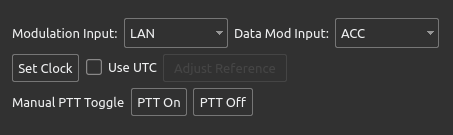
- Modulation Input: Select from the available transmit audio choices:
- LAN: Network audio for radios with built-in network support (this is what most network users will want)
- USB: USB port for radios with a USB port (this is what IC-7300 users will need for remote IC-7300 access using wfview’s built-in server)
- MIC: Microphone jack on the radio
- ACC: Accessory Port
- Data Mod Input: This is the transmit audio source for data modes. Generally not set to MIC. Usually you want this set to LAN or USB.
- Set Clock: Sets the radio’s clock to the same as the computer’s clock. wfview will send the time command at the next change-of-minute. Watch the status bar carefully and you may catch it.
- Use UTC: Sets the radio’s clock to the current UTC time, again using the computer’s clock as a reference.
- Adjust Reference (IC-9700 only): Brings up the reference adjustment window. It is very useful to switch to the view tab and zoom in on a reliable signal while adjusting these controls.
- Manual PTT Toggle: Use these buttons to manually toggle the PTT on or off. Useful if the View tab’s Transmit/Receive button becomes out-of-sync with the world.
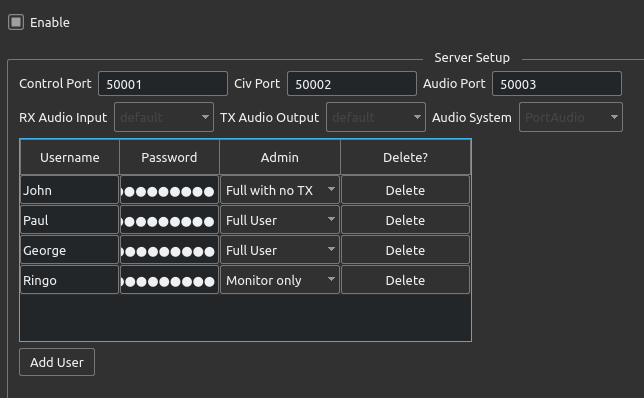
Radio Server
This page contains settings for the built-in radio server. This server is designed to take a serial or USB port radio, with audio, and allow it to be accessed over a network by another copy of wfview running on another computer. The radio server handles full-duplex streaming audio and radio control. The server is largely compatible with the Icom OEM protocol, but has been extended to allow for some additional functionality.
The wfview team has tested this feature extensively, with radios as old as the IC-736 and as modern as the IC-7300. Even across the ocean, audio and control can work quite well.
See this page of the manual for more information about remote control.
Brief description of controls:
- Enable: Check this box to enable the built-in server
- Control Port: This is the primary port for the server, used for server-related control tasks. The default is 50001.
- CI-V Port: This is the port through which CI-V traffic is passed. The default is 50002
- Audio Port: This is the port through which audio is passed. The default is 50003.
- Note: All traffic is UDP
External Control
These settings help other programs control the radio while wfview is open. This is useful if you like to use digital modes or logging programs. The best and most simple-to-use option is wfview’s excellent Hamlib Rigctld server, which emulates the hamlib rigctld program for TCP/IP control. Almost any program written to support Hamlib can utilize this mode of control. When TCP/IP isn’t an option, the built-inVirtual Serial Port (pseudo-terminal) support will create a fake serial port which other programs can connect to as though connecting to a genuine radio’s serial port directly. The Virtual Serial Port can only accept one program at a time, so if you need more than one, try and use the rigctld option, as it can allow for multiple clients at once.
Tip: The Hamlib model number for network control is #2, called “Hamlib NET rigctl (stable)”. The device string is “127.0.0.1:4532” (substitute whatever port is in wfview). fldigi can connect to wfview using this method if it is compiled with hamlib support. The port most programs expect is 4532.
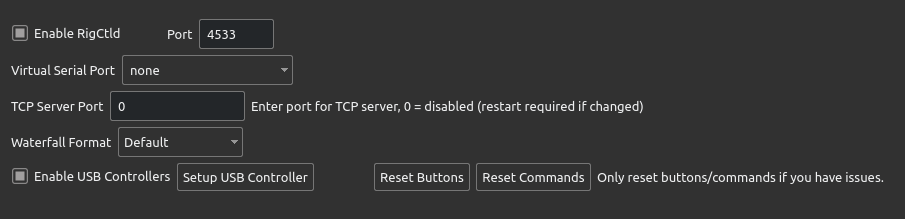
- Enable Rigctld: Enables the built-in rigctld server.
- Port: This is the port that wfview’s built-in rigctld server will listen on. The port most programs expect is 4532.
- Virtual Serial Port: Select a virtual serial port here through which other programs designed for a serial port can connect. See here for more details.
- TCP Server Port: This is a raw TCP/IP port for CI-V traffic and is compatible with N1MM+ and may work with RUMLogNG. To disable this feature, set it to zero.
- Waterfall Format: wfview can arrange the waterfall spectrum data so that the data are arranged as multiple separate chunks (serial connection style) or as single long messages (network radio style). This is useful if you are using a program on the Virtual Serial Port that expects serial connection style data, for example.
- Enable USB Controllers: This checkbox enables the use of external hardware USB controllers, such as the Icom RC-28, Contour Shuttle Express, Contour ShuttlePRO V2, and XBox. Please see this page for more information on how to setup and use external USB controllers.
- Setup USB Controller: Press here to open the USB Controller Setup page
- Reset Buttons: Press here to clear all button assignments
- Reset Commands: Press here to clear all button assignments and to reset your controller preferences. Use this option if the assigned button commands are malfunctioning. Once clicked, Save Settings and exit wfview.
See this page for more information on USB Controllers.
See this page of the manual for more information about sharing radio control. Also see this page on sharing audio with other programs.
Experimental
This page contains experimental and undocumented options. Currently, there aren’t any!