This page describes how to use USB-connected controllers with wfview to control your radio. Hardware controllers offer an immensely-improved user experience for tuning, changing modes, PTT, and more.
Supported Controllers
wfview supports the following USB controllers:
- Icom RC-28
- Contour Shuttle Xpress aka Shuttle Express
- Contour ShuttlePRO V2
- XBox USB controller TODO: Link for supported device
- P.I. Engineering USB 3 Switch Interface SK3SWI (beta)
- sunSDR Pro Ecoder Plus (beta)
- Quick Keys wireless (beta)
- Stream Deck:
- Mini, MiniV2, Original, Original V2, Original MK2, XL, XLV2, Pedal, Plus
You can have a look at the top portion of usbcontrollers.cpp for the complete list, if you are curious about it.
Preliminary Setup
You will need to connect the USB device to your computer. It is important that there are no other programs using the device. Generally drivers are not necessary since these devices are “HID Compliant”. Therefore, do not install any drivers or other software. wfview needs access to the USB device without any other programs or software using it at the same time.
Windows and macOS users: You should not need any preliminary setup. Please continue to the section wfview Controller Setup.
Linux Setup
Linux users will need to stop their desktop from using the wheel as a scroll wheel. This can be done per the following bash shell script taken from this reddit post:
#!/bin/bash
for DEV in `xinput --list | grep -i ShuttlePro | cut -d"=" -f2 | awk {'print $1'}`
do
     xinput disable ${DEV}
done
Linux users will also need the following udev rule, placed in /etc/udev/rules.d, which gives the user permission to access the shuttle device:
Contents of /etc/udev/rules.d/99-shuttle.rules:
# for newer PRO model
ATTRS{name}=="Contour Design ShuttlePro" MODE="0644"
# for older PRO model
ATTRS{name}=="Contour Design ShuttlePRO v2" MODE="0644"
# for the Xpress model
ATTRS{name}=="Contour Design ShuttleXpress" MODE="0644"
SUBSYSTEMS=="usb", ATTRS{idVendor}=="0b33", ATTRS{idProduct}=="0020", MODE="0666"
SUBSYSTEMS=="usb", ATTRS{idVendor}=="0b33", ATTRS{idProduct}=="0030", MODE="0666"
To activate the new rules, just pull the USB plug out and push it back in, that simple.
wfview Controller Setup
You will need wfview version 1.57 or greater. Currently the 1.60 release is recommended.
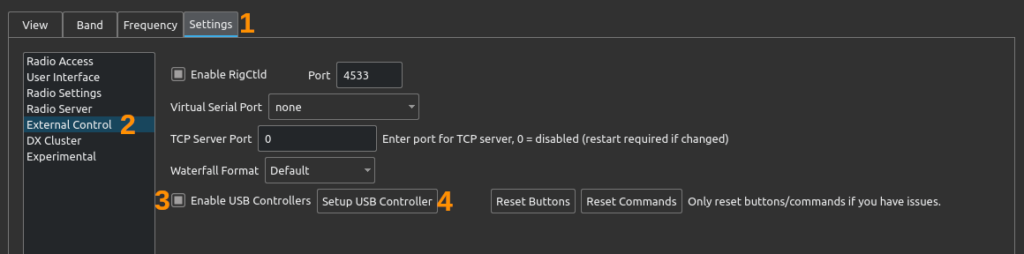
Connect the USB controller, and then, launch wfview. Click “Settings” followed by “External Control”. Check the box “Enable USB Controllers”. Then press “Setup USB Controller”.
The controller setup window will appear. This window is different for each type of supported USB Controller. Here is how it looks for the Contour ShuttlePRO V2:
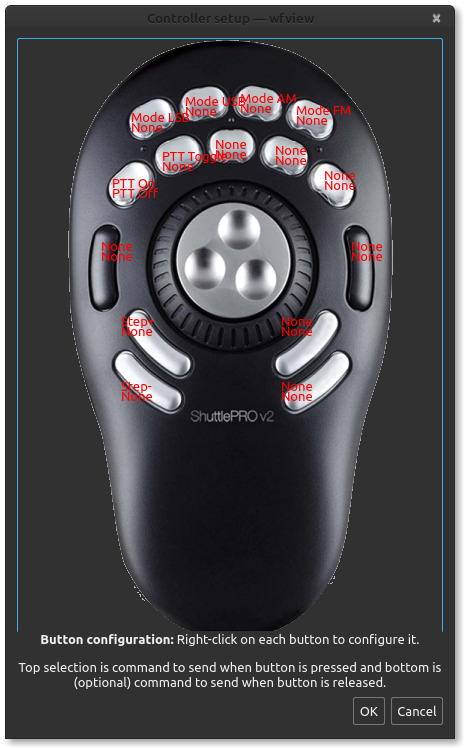
To assign a function to a button, right-click on the desired controller button. Two pop-up menus will appear. The top-most pop-up menu lets you select a function for when the selected button is pressed down. This is what most users will want for most functions. The bottom menu lets you select what will happen when the button is released. Generally, the bottom menu should be set to “None”. Sometimes you will need to right-click in an empty space in order to remove the menu and reveal other buttons (we’re working on a better way to do this).
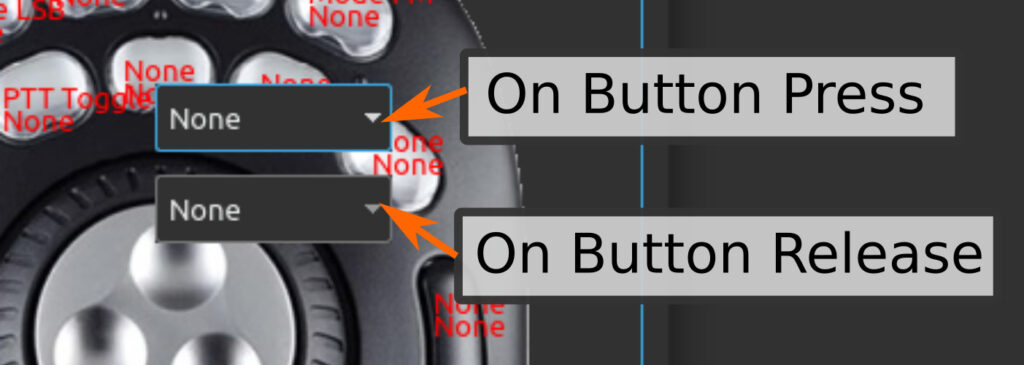
To program a traditional PTT button, like a handheld microphone, where the button is held down while you are transmitting, select “PTT On” for the press (top) function and “PTT Off” for the release (bottom).
For a PTT “sticky toggle” function like the radio’s chassis transmit button, select “PTT Toggle” for the top menu and select “None” for the release (bottom) menu
Press “Ok”
Important: Do not forget to press “Save Settings”!!