Once wfview has been downloaded, you will need to set up the radio and the program.
Radio Settings (via the Radio’s Menus):
- Icom radios:
- Set the radio to the default CI-V address.
- Enable CI-V Transceive. This is required unless the radio does not support this option (older pre-2012 radios).
- For Icom radios with ethernet or wifi (IC-705/905/7610/9700):
- Set a known username and password
- enable Network Control.
- Make a note of the radio’s ip address, which is visible in the Network Settings screen on the radio.
- Use the default ports (50001, 50002, and 50003), or use custom ports that you know
- For the Kenwood TS-890:
- Set the administrator username and password
- Enable KNS (it will not be possible to enable it until the username and password are set)
- For radios with Serial or USB (IC-7100/7200/7300/9100, TS-590S):
- Set the baud rate, on the radio and in wfview, to the highest supported rate, and make a note of the rate. Here is an in-depth guide to IC-7300 radio settings. If you have difficulty with collisions, try progressively slower baud rates.
wfview settings:
When you open wfview for the first time, you will be guided to the Radio Access Settings page. However, you can get to the settings page any time by pressing “Settings” at the bottom of the wfview main window and then selecting “Radio Access”.
Here is how the settings page looks. Note that when you enable “Network” or “Serial (USB)”, different options will be available.
Fill in the following information:
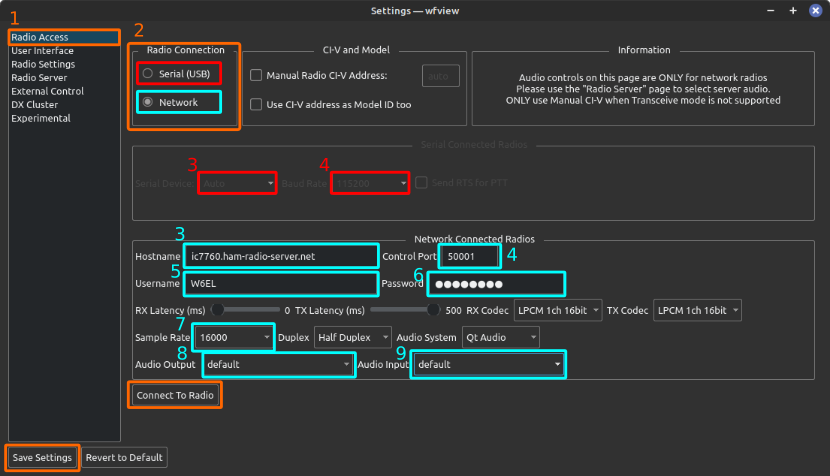
First press [1] “Radio Access” on the left side if it is not already selected.
For Serial (USB Port) radios (IC-7300/7200/7100):
- Select [2]: “Serial (USB)”
- Select the [3] Serial Device.
- Select the [5] Baud Rate.
- Do not check “Manual Radio CI-V Address”
- Do not check “Use CI-V address as Model ID too”
For Network (ethernet or wifi) radios (IC-705/905/7610/7850/9700):
- Type in the [3] IP address of the radio or radio server. If you know the hostname, you may supply the hostname instead.
- Enter the [4] Control Port. The default is 50001 on most radios.
- Enter the [5] username as set on the radio.
- Enter the [6] password as set on the radio.
- Select [7] the desired sample rate. 16000 Hz is plenty for most applications. Do not leave this blank.
- Select the [8] audio output device you wish to use. Typically this is your headset or speakers. Linux users may simply select “default” for their desktop environment’s default audio choice.
- Select the [9] audio input device you wish to use. Typically this is your microphone. Linux users may simply select “default” for their desktop environment’s default audio choice.
- Do not check “Manual Radio CI-V Address”
- Do not check “Use CI-V address as Model ID too”
- Important: Set the RX Codec and TX Codec to “LPCM 1ch 16bit”. You may experiment with other codecs later.
- Important: Set the RX and TX Latency sliders to a middle value of 250ms.
Next:
- Press “Connect to Radio”
- And if successful, press “Save Settings”