To be able to use wfview with digital modes like FT8, PSK etc. It is necessary to create “virtual audio” connections. These are effectively loopback sound cards that the transmit and receive audio are sent via wfview and allow your digital mode software (WSJT-X, Fldigi etc) to connect to it.
We have tested configurations in both Windows and Linux but similar functionality can be achieved in MacOS using a tool called SoundFlower https://github.com/mattingalls/Soundflower
The following are only required for users who are connected to their rig via LAN/WiFi. For USB connected rigs, you can simply use the USB audio devices provided by your rig.
Windows Virtual Audio Cable
For Microsoft Windows users, we have tested Virtual Audio Cable https://vac.muzychenko.net/en/index.htm which must be registered and costs $30 for non-commercial use. VB-Cable is a free alternative that can be downloaded from https://vb-audio.com/Cable/index.htm it should work and we will hopefully get a chance to test it at some point.
In VAC You will need to create two “Cables” as per the image below:
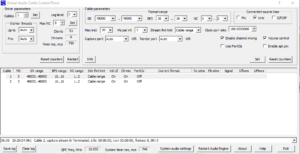
The key settings are the Sample Rate (SR) which should be 48000 and BPS Range which should be 16bit. I only enabled Line in the “Connected Source Lines”.
Once you have this running, it is simply a case of selecting the Audio Output and Input devices in wfview and your other software. In wfview, Audio Output should be “Line 1 (Virtual Audio Cable” and Audio Input “Line 2 (Virtual Audio Cable)”. In your software, for example WSJT-X, under the Audio tab, Input wants to be “Line 1 (Virtual Audio Cable)” and Output “Line 2 (Virtual Audio Cable)”. Basically, the output of wfview connects to the input of WSJT-X and the output of WSJT-X connects to the input of wfview.
Loopback Audio Devices in Linux
With Linux, no additional software is required however it will need some configuration completing. The following was completed on Ubuntu 18.04 but should be similar for any Debian derived version of Linux.
The basic concept is similar to Windows, you create two loopback devices (virtual audio cables).
If it doesn’t exist already, create a file called /etc/rc.local which will contain various commands that must be run at startup.
sudo nano /etc/rc.local
Add the following into the file (if the file already exists then just add the sudo line.)
#!/bin/sh
#
sudo modprobe snd-aloop

exit 0
Newer versions of Ubuntu do not run rc.local by default so this must be enabled.
sudo systemctl enable rc-local.serviceIf you receive an error about the unit files having no [Install] section, you will need to do the following. If you don’t receive an error, skip to “Configuration for snd-aloop device”
sudo nano /etc/systemd/system/rc-local.service
Then add the following to this file:
[Unit]
 Description=/etc/rc.local Compatibility
 ConditionPathExists=/etc/rc.local

[Service]
 Type=forking
 ExecStart=/etc/rc.local start
 TimeoutSec=0
 StandardOutput=tty
 RemainAfterExit=yes
 SysVStartPriority=99

[Install]
 WantedBy=multi-user.target
You will also need to set the executable permission on the rc.local file and enable the service
sudo chmod +x /etc/rc.local
sudo systemctl enable rc-local.service
If all worked, you will not receive an error on either of these commands!
Configuration for snd-aloop device
The snd-aloop device also needs configuration, this is done in /etc/modprobe.d/virtual-sound.conf (the file can actually have any name as long as it has the .conf extension)
sudo nano /etc/modprobe.d/virtual-sound.conf
Add the following into this file. This creates 2 loopback devices (10 and 11) You can add more devices here if needed:
alias snd-card-0 snd-aloop
options snd-aloop enable=1,1 index=10,11
Now Reboot your computer!
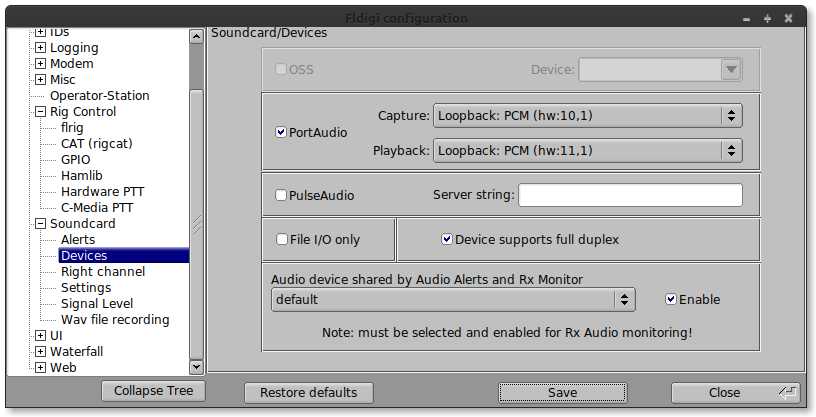
Once rebooted, you should be able to run wfview and see a number of new device.
In the Audio Output combobox, select: Be careful, the wfview side of both loopback devices is “DEV=0”
hw:CARD=Loopback,DEV=0
Then in the Audio Input combobox, select:
hw:CARD=Loopback_1,DEV=0
Here is a screenshot of wfview properly configured for loopback audio:

For most applications, select the following for Input: Be careful, the application side has “DEV=1”.
hw:CARD=Loopback,DEV=1
For Output:
hw:CARD=Loopback_1,DEV=1
The WSJT-X Audio tab should look similar to this:
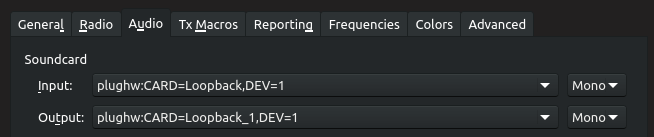
fldigi Audio configuration
After following the above guide for creating a loopback device, configure fldigi’s audio as shown (there will be some differences depending upon the platform). If you enable the “RX Monitor” feature, then you can select your speakers and hear the receive audio from the radio and keep the audio going into fldigi for decoding! Be sure to select the correct instance of each loopback device. The “,1” part means you are on the second side of each loopback device (DEV=1 basically). Note that the capture device is connected to the wfview Audio Output device, and the Playback device is connected to the wfview Audio Input device.
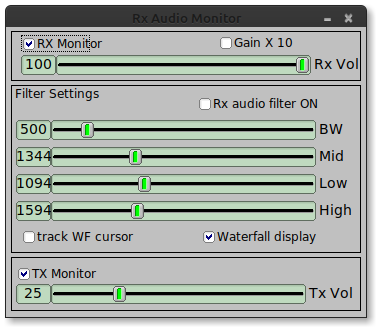
If you’d like to hear the audio in the loopback, use the RX Audio Monitor inside fldigi. It can be accessed under the View menu and is called “Rx Audio Dialog”. From there, you may enable the “RX Monitor” and “TX Monitor” (TX Monitor is available in versions 4.12.24 and greater). The TX Monitor is a great way to hear your CW sidetone if you do CW in fldigi.