Objective
The objective is to be able to decode standard 1200 baud AFSK APRS packets using the network access from the IC-9700 and wfview’s audio. This how-to focuses on Linux, however similar methods will work on other operating systems.
Setup
First, follow the Audio Setup guide for linux, creating two loopback devices, each with two entry points. Follow the document carefully. After you reboot, launch wfview and select the audio loopback devices. Make sure to carefully select the audio ports per the linked page. If you select the wrong ports, you won’t have any audio. Select the ports and then Save Settings and close wfview. Optionally, use a program like Audacity to verify the audio.
Check that you can see the loopback devices via this command:
eliggett@genesis:~$ arecord -l
**** List of CAPTURE Hardware Devices ****
card 1: Generic_1 [HD-Audio Generic], device 0: ALC257 Analog [ALC257 Analog]
Subdevices: 1/1
Subdevice #0: subdevice #0
card 10: Loopback [Loopback], device 0: Loopback PCM [Loopback PCM]
Subdevices: 8/8
Subdevice #0: subdevice #0
Subdevice #1: subdevice #1
Subdevice #2: subdevice #2
Subdevice #3: subdevice #3
Subdevice #4: subdevice #4
Subdevice #5: subdevice #5
Subdevice #6: subdevice #6
Subdevice #7: subdevice #7
card 10: Loopback [Loopback], device 1: Loopback PCM [Loopback PCM]
Subdevices: 7/8
Subdevice #0: subdevice #0
Subdevice #1: subdevice #1
Subdevice #2: subdevice #2
Subdevice #3: subdevice #3
Subdevice #4: subdevice #4
Subdevice #5: subdevice #5
Subdevice #6: subdevice #6
Subdevice #7: subdevice #7
card 11: Loopback_1 [Loopback], device 0: Loopback PCM [Loopback PCM]
Subdevices: 7/8
Subdevice #0: subdevice #0
Subdevice #1: subdevice #1
Subdevice #2: subdevice #2
Subdevice #3: subdevice #3
Subdevice #4: subdevice #4
Subdevice #5: subdevice #5
Subdevice #6: subdevice #6
Subdevice #7: subdevice #7
card 11: Loopback_1 [Loopback], device 1: Loopback PCM [Loopback PCM]
Subdevices: 8/8
Subdevice #0: subdevice #0
Subdevice #1: subdevice #1
Subdevice #2: subdevice #2
Subdevice #3: subdevice #3
Subdevice #4: subdevice #4
Subdevice #5: subdevice #5
Subdevice #6: subdevice #6
Subdevice #7: subdevice #7
eliggett@genesis:~$
You will need to install either direwolf or multimon-ng, or both, as well as sox:
$sudo apt-get install direwolf multimon-ng sox
Note that direwolf will provide a cleaner output and also allow you to contribute what you receive to the igate server, which is pretty cool. Don’t be intimidated by the direwolf setup; for our purpose the setup is merely 7 lines, detailed below.
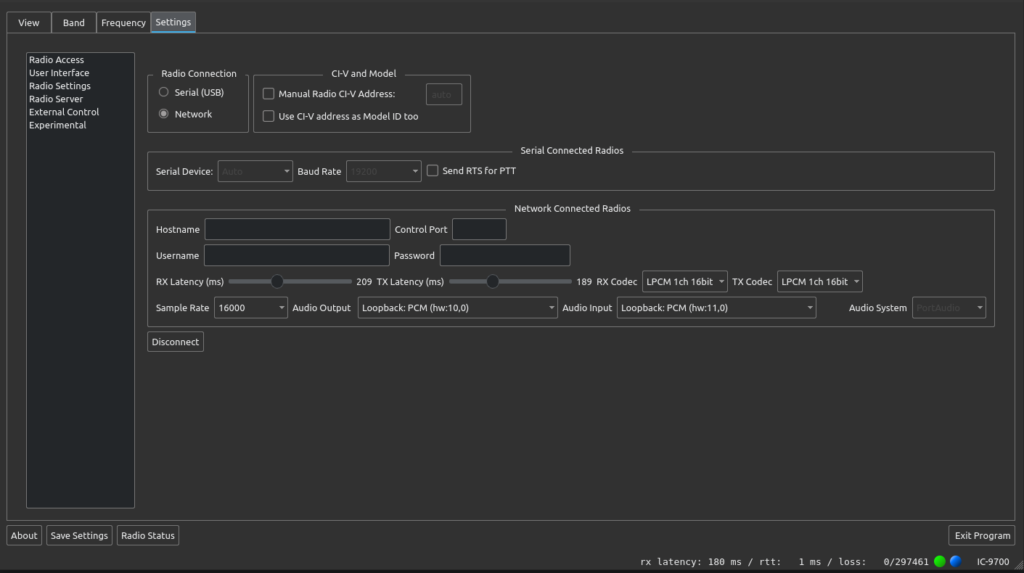
Minus the obvious hostname, username, and password, here is how my wfview Radio Access setup looks. Be sure to set the CODEC to LPCM 16bit. The sample rate should be at least 16k (you may have more success setting this to 48k with direwolf and 22050 for multimon-ng, but I did not experiment. The sox commands below will set the loopback to 48k in both cases). To be clear, the Audio Output should be “Loopback: PCM (hw:10,0)” and the Audio Input should be “Loopback: PCM (hw:11,0)”. This is per the Audio Configuration linked above.

Setup the APRS program:
Note: It is far easier to start the APRS chain prior to opening wfview. This is because the APRS programs (and sox) are less-flexible about sample rates and audio formats in general, so we start sox and the APRS programs first, so as to define the audio format which wfview will then follow.
For direwolf, you need to follow the most basic setup first. I made the following direwolf config file, which I called “direwolf.conf”:
ADEVICE null null
CHANNEL 0
MYCALL W6EL
IGSERVER noam.aprs2.net
IGLOGIN W6EL PASSWORDHERE
MODEM 1200

PBEACON sendto=IG delay=0:40 every=20 symbol=R& alt=475 lat=34.23386N long=118.25866W comment="iGATE AAPRS rx-only"
You should use this link to get your APRS password. I don’t really understand how this works but in any case, it worked for me.
For multimon-ng, there isn’t any setup.
Starting the APRS programs:
For direwolf, use this command (copy-paste carefully! Be sure to enter the path for the direwolf config file correctly.):
sox -q -t alsa hw:10,1,0 -e float -b 32 -r 48000 -t raw -b 16 -c 1 -e signed-integer -r 48000 - | direwolf -c ./direwolf.conf -r 48000 -D 1 -t 0 -
For multimon-ng:
sox -q -t alsa hw:10,1,0 -e float -b 32 -r 48000 -t raw -b 16 -c 1 -e signed-integer -r 22050 - | multimon-ng -t raw -a AFSK1200 -A /dev/stdin
Note, if you wish, you can start sox without the “-q” flag and without the pipe to the APRS program. In this mode, you can see the audio level in a small bar-graph. There won’t be any decoding, but it is fine for testing the audio pipe.
I will note here that it took me about two hours to come up with those two commands. The sample rate for multimon-ng must be 22050, and multimon-ng doesn’t seem to provide any way to select another audio device. Direwolf is flexible with sample rates. sox must be setup with the loopback audio format matching any format that has already been applied to the loopback device, and it won’t tell you what that is! This is why I start sox first, before I open wfview, so that sox may define the audio format, and wfview will follow whatever format is applied.
Monitoring APRS packets
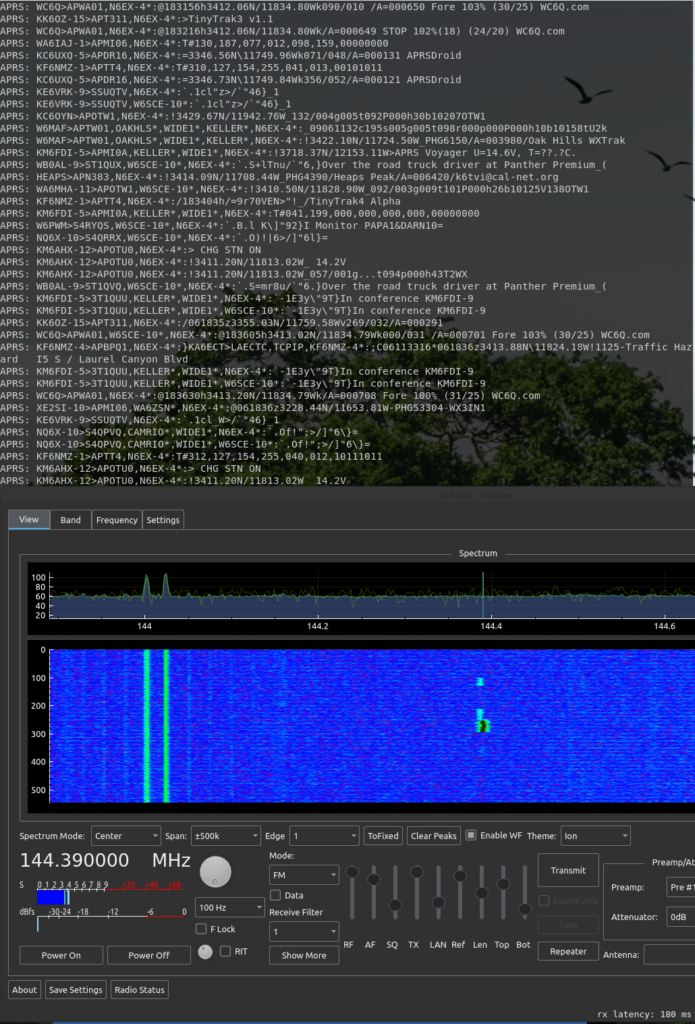
With one of the above commands (sox + direwolf or sox + multimon-ng), launch wfview and confirm the loopback devices are selected. If necessary, press Disconnect, select the loopback devices per the audio configuration how-to, and then press Save Settings and hit Connect. Now tune wfview in to your local APRS frequency. 144.39 FM is used in SoCal, for example. Turn up the AF Gain slider all the way (if the signal is too loud or distorted, turning this down will just make it quiet-yet-distorted, so adjust the LAN RX level at the radio if needed). I recommend setting the squelch so that it opens with the slightest signal, or all the way down if desired. Use the “RxAudio” meter to monitor the audio coming from the radio.
To visualize the station locations, you might wish to try xastir or YAAC. I have not tried either yet.
