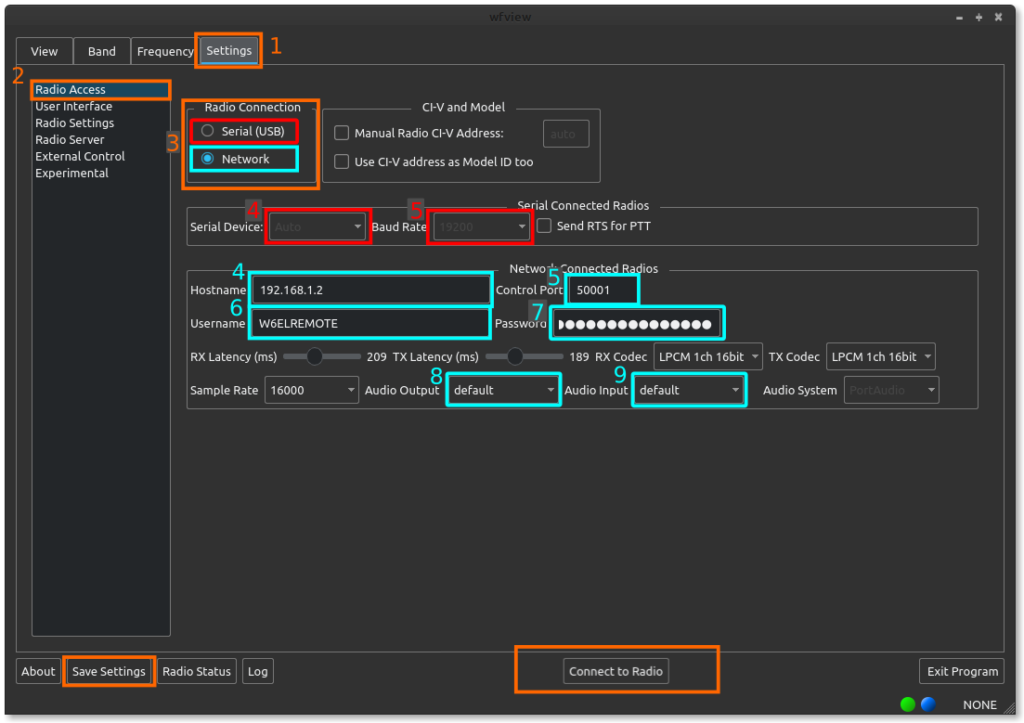
Once wfview has been downloaded, you will need to set up the radio and the program.
Radio Settings (via the Radio’s Menus):
- Set the radio to the default CI-V address.
- Enable CI-V Transceive.
- For radios with ethernet or wifi: Set a known username and password, and enable Network Control. Make a note of the radio’s ip address, which is visible in the Network Settings screen on the radio.
- For radios with Serial or USB: Set the baud rate to the highest supported rate, and make a note of the rate. Here is an in-depth guide to IC-7300 radio settings.
wfview settings:

First:
Press [1] “Settings” and then press [2] “Radio Access”. Select [3] either Serial (USB) or Network.
For Serial (USB) radios (7300):
- Select the [4] Serial Device
- Select the [5] Baud Rate
- Do not check “Manual Radio CI-V Address”
- Do not check “Use CI-V address as Model ID too”
For Network (ethernet or wifi) radios (705, 7610, 9700):
- Type in the [4] IP address of the radio or radio server. If you know the hostname, you may supply the hostname instead.
- Enter the [5] Control Port. The default is 50001 on most radios.
- Enter the [6] username as set on the radio.
- Enter the [7] password
- Select the [8] audio output device you wish to use. Typically this is your headset or speakers. Linux users may simply select “default” for their desktop environment’s default audio choice.
- Select the [9] audio input device you wish to use. Typically this is your microphone. Linux users may simply select “default” for their desktop environment’s default audio choice.
- Do not check “Manual Radio CI-V Address”
- Do not check “Use CI-V address as Model ID too”
Next, for both types:
Press “Connect to Radio” (bottom of the window). If successful, the radio model number should appear in the window title bar and the lower-right corner of the window. Once working, press “Save Settings” (bottom left of the window).