This is the Settings Tab:
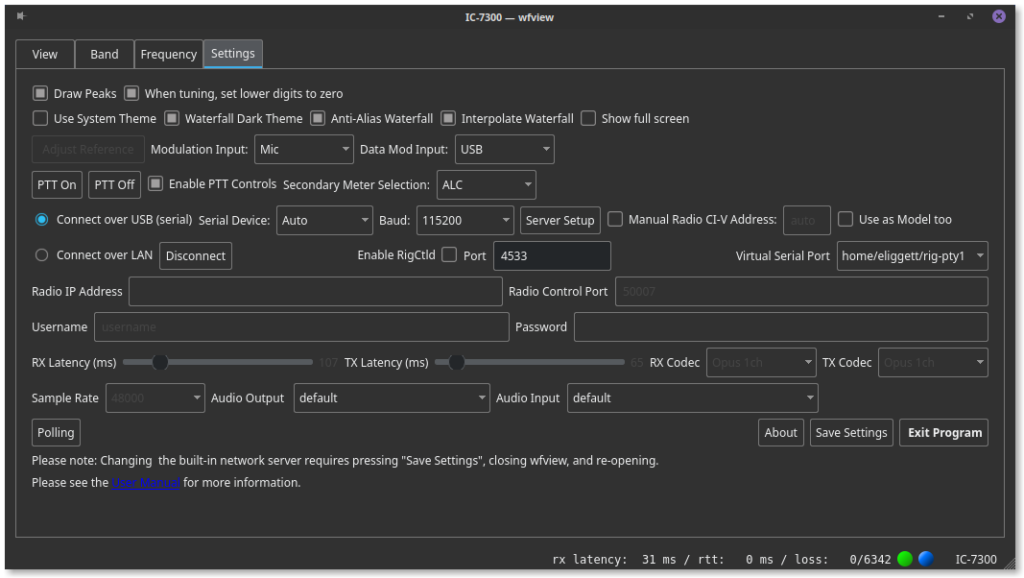
From the settings tab, numerous program and radio settings may be adjusted.
Radio Connection Settings:
These controls are for the user to select and connect to the radio. When changing these controls, make sure to press “Save Settings” to save the settings for next time. Also, if a different rig is being selected after connecting to a rig, save the settings and re-launch wfview.
Serial Connections:
If an Icom radio is connected with a USB cable, wfview will generally find and use this connection automatically, without any intervention from the user. If you are having difficulty getting a USB connection to work, you may need to change port permissions. We have a section of the users guide for this, but to temporary try changing permissions, use the following command:
sudo chown $USER /dev/ttyUSB*
The serial device may also be specified using the Serial Device combo box. “Auto” is for automatic detection. wfview automatically populates this list with normal serial devices. If you are using a pseudo-terminal (such as from socat), you may select “Manual…” and enter in the serial port desired. Be sure and press “Save Settings” if you use this feature. And note that you may edit the serial port manually in the preference file, as detailed in the preferences section of this manual.
- Baud: For radios with waterfall view, such as the 7300, you must select 115200 at both the radio and within wfview, otherwise the radio will not generate a waterfall view. For all radios, make sure you match the radio’s baud rate setting.
- Manual CI-V address: Use this box only if you cannot enable CI-V Transceive on the radio. It is strongly recommended to keep CI-V Transceive ON, and to not check this box. Some older radios do not respond to our Rig-ID requests, and for those radios, please supply the CI-V address here. The address is supplied in hex, which is the same way the CI-V address is given in the radio’s menu.
- Use as Model too: Check this box for older radios that do not have a Rig Identification command. wfview will assume that your supplied CI-V address is the manufacturer’s default address and use this address as the radio’s model number, which is what modern radios do. Don’t check this box unless you need to.
- Server Setup: This button enables a built-in CI-V and audio server. Use this feature to take a radio without an OEM network connection and “serve” it to the network. This button is intended for use with the IC-7300, but may be used on any CI-V radio. Once the server is running, you can launch a separate instance of wfview on another computer and connect to the radio. The other instance of wfview will have access to the radio’s audio and control.
Network Connections:
To connect to a radio over WiFi or Ethernet, click on the “Enable LAN” radio button. This button also enables the text boxes so that radio information may be entered. You will need to supply the radio’s IP address (or hostname), Radio Control Port (the default is 50001), Username, and Password. These settings are defined at the physical radio. Also be sure to enable network control. Once filled in, press “Connect”. If successful, don’t forget to press “Save Settings”.
- Connect/Disconnect: This button causes the connection to be made to the rig, or, for the existing connection to drop.
- RX Latency (ms): Adjusts the buffer size for the receive audio. If you encounter hiccups in the receive audio, you may want to increase this value. For lower latency, such as an at-home ethernet connection, lower values may be used. The default is 150ms.
- TX Latency (ms): This is an adjustment for the transmit audio buffer. Longer values are needed for lower-quality connections. The default is 150ms.
- RX Codec: Select the encoding method for the receive audio. LDPCM is uncompressed 16-bit audio, like a CD. uLaw is a lower-bitrate and slightly lower-quality option involving logarithmic spaced bits. If, however, you are connecting to a wfview server, you may also select “Opus” which is a high quality lossy compression option with significantly lower bandwidth requirements. Opus is recommended when available, but remember, there are no radios with this option built-in; it will only work with radios using a local wfview server (such as an IC-7300).
- TX Codec: Same as above.
- Sample Rate: This is the sample rate applied to both transmit and receive audio streams. 48k is the default. Lower sample rates will lower the required network bandwidth, and generally sound fine for most usage.
- Audio Output: Use this control to select the audio output device for your system. Linux users may see several devices here. wfview attempts to select the “default” system device on startup, and that should generally be used if at all possible. Using the system’s control panels to select and test the default device (for example, a USB headset), prior to the launching of wfview, is strongly advised.
- Audio Input: Same as above but for the transmit audio source.
PTT:
Use these controls to manually toggle the PTT (transmit) on and off. The “Enable PTT Controls” checkbox must be checked in order to send transmit commands. Note that this control does not lock out the transmit button on the radio (although that can be done from the physical radio’s settings). wfview also has an automatic five minute transmit timeout. For radios with a PTT command (most), wfview will send the PTT command over CI-V. For radios without this command, wfview will toggle the RTS pin of the serial converter.
Appearance and Behavior Settings:
- “Draw Peaks” enables a backdrop on the spectrum plot, which holds the maximum value for each frequency. The peak data is cleared upon changing the scope bounds or pressing the “Clear Peaks” button.
- “Waterfall Dark Theme” toggles between a bright theme and a dark theme for the waterfall and spectrum plot. The colors can be adjusted by editing the preference file. This is detailed more in the preferences section of the manual.
- “Use System Theme” toggles between a built-in theme (qdarkstyle) and the operating system’s supplied theme. For linux users, the operating system theme can usually be adjusted using your system preferences. The built-in theme may be customized by editing the installed stylesheet (linux only) or specifying a custom stylesheet in the user preference file.
- “Show full screen” toggles between windowed and full screen mode. Pressing F11 also toggles this state.
- “When tuning, set lower digits to zero”: This checkbox causes the frequency to round to the selected tuning step. It also applies for double-clicking in the waterfall.
- Anti-Alias Waterfall: Toggles the anti-alias smoothing algorithm for the waterfall view. Recommended.
- Interpolate Waterfall: Toggles the interpolation of in-between pixels on the waterfall view. Useful with large screens.
Modulation (mic):
These two combo menus allow the user to select the modulation (transmit audio) source, for both normal and data modes. For remote operation using the OEM network connection, select “LAN” for both. For rigs using a USB connection where the audio is being served using the wfview server, select USB. The modulation level for the selected source can be adjusted on the View tab, and will be labeled with the same name as the source.
Calibration (Reference):
Adjust Reference (IC-9700 only): This button brings up the Adjust Reference dialog box. From this box, the radio’s internal reference may be adjusted. Unlike the radio’s user interface, this allows you to view the waterfall display while making adjustments to the reference. Calibrating the radio to a known-good source on the air, such as a beacon, is a snap.
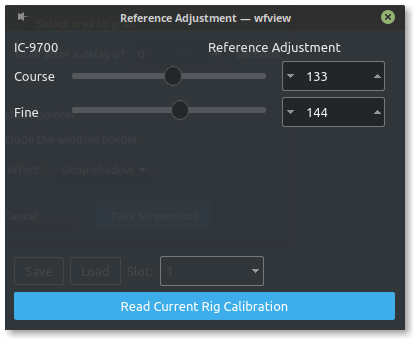
To adjust the reference, tune into a known-good station or connect appropriate test signal generation equipment. Now press “Read Current Rig Calibration”. wfview will read the radio’s current settings and update the UI controls. From here, it is recommended to switch to the View tab of wfview. You can now drag the Course and Fine adjustments and see the spectrum change. For best results, begin with the “Center” spectrum mode. Bring wfview in to the 5 KHz span. Be mindful of the mode selected. In sideband mode, the IC-9700 will center the display at the passband center. In wfview, the spectrum’s axis always indicate real frequency, so use this as a guide. Once zoomed in, press “ToFixed” to fix the spectrum bounds. Now adjust the Course reference until the test signal’s waterfall mark lands on the prescribed frequency.
Other
Polling: Click here to set the polling rate. The rate is automatically computed from the baud rate upon rig connection, however, there can be circumstances where slower polling is useful, such as when sharing the connection to the radio with other programs.
Secondary Meter Selection: Pick the type of secondary meter desired (if any). The secondary meter is shown under the primary meter on the main tab of the program.
Save Settings: Press this button to save the current wfview configuration to the settings file. Attributes saved include:
- Radio connection type and interface
- Appearance settings
- Window size
- Full screen status
- waterfall and spectrum plot divider position
- Frequency memories
The preferences are stored plaintext, and contain many other useful things, as is explained in the preferences page.
About: Shows the about dialog box, including program build date and version
Exit Program: Closes the program
Debug (debug builds only): Runs debug functions. This button is disabled on release builds.
Satellite Ops: Incomplete feature to facilitate satellite operation on the IC-9700. This button is disabled on release builds.