Here is the main display from wfview. Scroll down for a description of each UI element.
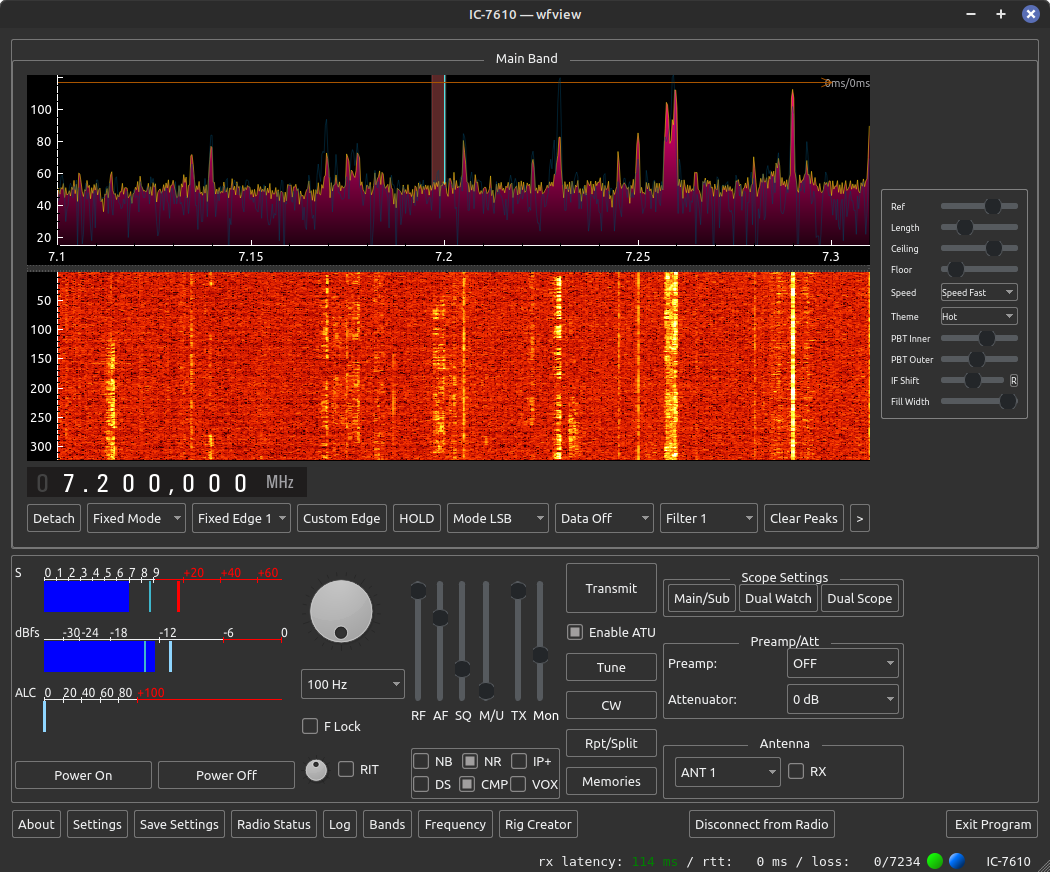
Upper controls:
Spectrum plot and waterfall display:
These two items show the spectrum data passed from the radio to wfview. The vertical axis of the upper plot is likely proportionate to a value in dB, although the exact scale conversion isn’t known. Left to right is frequency. The bottom plot’s vertical axis is time, with newer values going in at the top. Many adjustments for these plots are available, read on to learn more.
Double-click anywhere in the plot to immediately jump frequency. A single click will simply show the frequency in the lower-left status bar area. Use the scroll wheel to quickly jog around the band at the selected tuning step.
The vertical tuning line in the upper plot indicates the carrier point of the radio. This is the frequency the dial indicates as well. The tuning line color can be customized (and even disabled via a transparent color) under the Settings tab on the User Interface page.
There is a divider between the upper plot and the lower waterfall section. You can drag the divider up and down to change the division of area between the plot and the waterfall.
Spectrum Mode and Edge controls:
- Spectrum Mode: This control selects between the radio’s built-in four modes: Center, Fixed, Scroll-C, and Scroll-F.
- Span: This control sets the total span for the spectrum, and is only available in Center and Scroll-C modes.
- Edge: In Fixed and Scroll-F modes, this control selects the current edge (1 through 4). Edges are simply the boundaries for the scope data.
- Custom Edge: This button lets you define the scope edges in Fixed mode (in Scroll-F mode, the edge you define is translated over to the current frequency). The Custom Edge dialog box makes it very easy to jump to a desired frequency range.
- ToFixed: This button will take the current center span range and convert it into a fixed range. It is a quick way to keep the same displayed range and allow for tuning without changing the range displayed. Only shown in Center mode.
- Clear Peaks: Clears the spectrum underlay, which can be either Peak Hold, Buffered Peak Hold, or Average (select the desired mode under Settings).
- Press the “<” button at the end of the buttons to show additional controls.
Mode and Filter selection:
- Mode: Select the transmit and receive mode. LSB/USB switching defaults to automatic (see the Settings window).
- Data Off / Data On: When “Data” is turned on, the radio will use, potentially, an alternate modulation input and filter selection. See the radio manual for details.
- Filter 1/2/3: Select any of the three defined receive audio filters that the radio has available.
Detach: Pressing this button will detach the spectrum display from the other controls. This is especially useful for placing the spectrum display on a separate monitor.
Frequency Widget: Press the top or bottom of a given digit to nudge the value. The scroll wheel can scroll any position. Right-click to zero a digit. This widget was borrowed and modified from CuteSDR under the GNU GPL.
Additional Spectrum and filter controls:
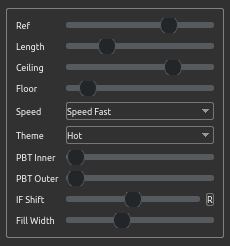
Pressing the “<” or “>” button (to the right of “Clear Peaks”) will show/hide the additional controls.
- Ref: This is the so-called “reference level” for the spectrum display. Increasing this control has the effect of increasing the data value of the spectrum. Note that you can leave this full cranked and then use the Floor and Ceiling controls for a similar effect but with greater display resolution.
- Length: how long the waterfall display is. Shorter values will make the waterfall look a bit faster.
- Ceiling: Top value for the spectrum display and waterfall color mapping
- Floor: Bottom value for the spectrum display and waterfall color mapping. Set this just below the noise floor.
- Speed: How often the radio sends spectral data.
- Theme: Color scheme for the waterfall display. These are defined within qcustomplot and can be previewed here.
- PBT Inner: Pass Band Tunable filter inner position
- PBT Outer: Pass Band Tunable filter outer position
- IF Shift: Performs IF Shift on radios with this function, otherwise, shifts the inner and outer PBT by the same amount
- Fill Width: Filter width for radios with variable filter width
Middle Controls:
Metering:
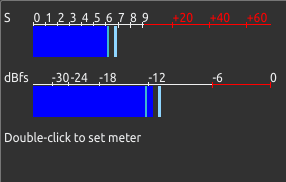
wfview can display three meters at a time. The first meter is always power output during transmit, and receive strength (“S”) during receive.
Meters include: SWR, ALC, Compression, Voltage, Current, Center (IC-R8600 only), TxRxAudio, RxAudio, and TxAudio. Please keep in mind that the audio meters will only function for the client side of network radios. The audio meters do not do anything with a locally-connected USB radio.
To change what is metered, simply double-click on the meter (or blank meter space). Click to the right side of the menu to “get out of the menu”.
The meter update speed is proportionate to the radio data polling rate, which can be adjusted in Settings.
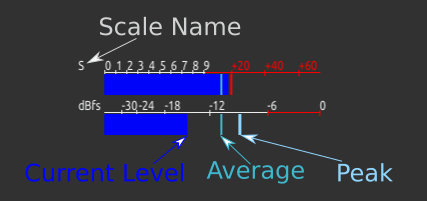
The meter displays three numbers at a time.
- Instantaneous Level: This is the long solid bar which shows you the same value as the radio’s meter.
- Average: A thinner bright bar showing the average of the last ten or so readings.
- Peak: A thicker bright bar showing the maximum of the last ten or so readings.
Radio Power:
Power On / Power Off: For radios with this capability, the radio may be powered on or off remotely. When powered off, the radio enters a low-power standby state. Keep in mind that it can be quite confusing if you connect to a radio which is powered off, you will need to manually power it back on when starting wfview.
Tuning:
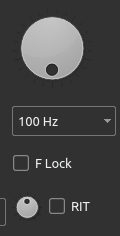
wfview has a rather conventional tuning knob (the large circle thing), which can be moved around with the mouse at the selected tuning steps (see the pop-down menu of tuning steps). Shift and control are modifiers for the step as well.
Tuning methods:
- The tuning knob screen widget
- Scrolling the mouse on the spectrum
- Double-clicking within the the spectrum
- +/- keys and other supported keyboard shortcuts
- The “Frequency” window (press * to bring it up quickly).
- Supported hardware interfaces with actual knobs and buttons
F Lock: Prevents the wfview user interface from changing frequencies. Does not lock the radio’s physical controls. Does not prevent external control (ie, other programs) from tuning. Just stops accidental mouse clicks within wfview basically.
RIT: Receive Incremental Tuning: applies a delta to the receive frequency
Sliders:
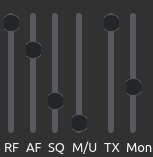
- RF: Receiver RF Gain
- AF: Receive audio gain. For USB and Serial connected radios, this sets the speaker volume on the radio. For network audio radios, this sets the computer’s apparent receive audio level.
- SQ: Squelch. If you don’t hear any audio, try turning this down.
- MIC / LAN / ACC / USB/ M/U: Slider to adjust the transmit audio gain for the selected transmit audio source.
- TX: Transmit RF Power level. This control is in percent.
- Mon: Monitor audio level (“Hear myself” aka “talkback” in some circles). Click the “Mon” text to toggle this feature on and off. Warning: Network latency makes this something you really do not want to leave on.
Square Toggle Controls:

- NB: Noise Blanker
- NR: Noise Reducer (DSP)
- IP+: Basically nothing
- DS: Digi-Sel preselector
- CMP: Transmit audio compressor
- VOX: Voice on Transmit. Use carefully.
Additional:

- Transmit: Toggles PTT. You can also press Control-R and Control-T for transmit and receive. Plus we support several hardware controllers for footswitches and tactile buttons.
- Enable ATU: Enables the radio’s ATU function.
- Tune: Cause the ATU to begin a tuning cycle
- CW: Shows the CW window
- Rpt/Split: Shows the repeater and split window (also CTCSS/DPL controls)
- Memories: Shows the memory editor
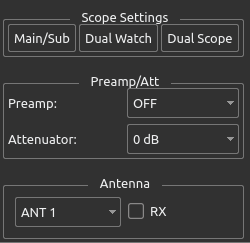
Scope Settings:
- Main/Sub: Swap the main and sub VFOs
- Dual Watch: Enable receiving two frequencies at once
- Dual Scope: Show a bandscope for each VFO (where supported: 7610 and 7850)
Preamp/Att:
- Preamp: Set the desired preamp
- Attenuator: Set the attenuator
Antenna:
- Select an antenna
- RX: Toggle the “RX” antenna port
Bottom:

Buttons:
- About: Shows the about window with version number, build date, credits, and so on
- Settings: Shows the settings window
- Save Settings: Saves the settings you are currently using for next time.
- Radio Status: Shows detailed radio information about the current connection (network radios only)
- Log: Displays wfview’s internal log data.
- Bands: Shows a band selector with common ham radio bands (and some others)
- Frequency: Frequency entry widget. Press “*” to bring it up for rapid entry
- Rig Creator (if enabled): An advanced option which allows radio definition files to be edited and/or created.
- Connect to Radio / Disconnect from Radio: Causes the serial or network connection to toggle.
- Exit Program: Closes wfview
Status Text:
- rx latency: Actual latency from the radio to wfview.
- rtt: Round trip time in addition to the rx latency.
- loss: Packets lost and total packets sent. For example, 0/7234 means zero packets lost and 7234 packets sent.
- Green circle: Receiving
- Red Circle: Transmitting
- Split Red/Green circle: Split or repeater mode enabled
- “None” or “radio name”: Indicates the detected radio connected. When it says “None”, wfview isn’t connected or is connected but cannot identify the connected radio.
