This is the “View” tab of wfview:
This tab of wfview is the main tab, where the waterfall display can be viewed and the rig’s most common controls are located. During a QSO or while browsing the airwaves, this is the tab that will be usually used. You can quickly jump to this tab any time by pressing F1.
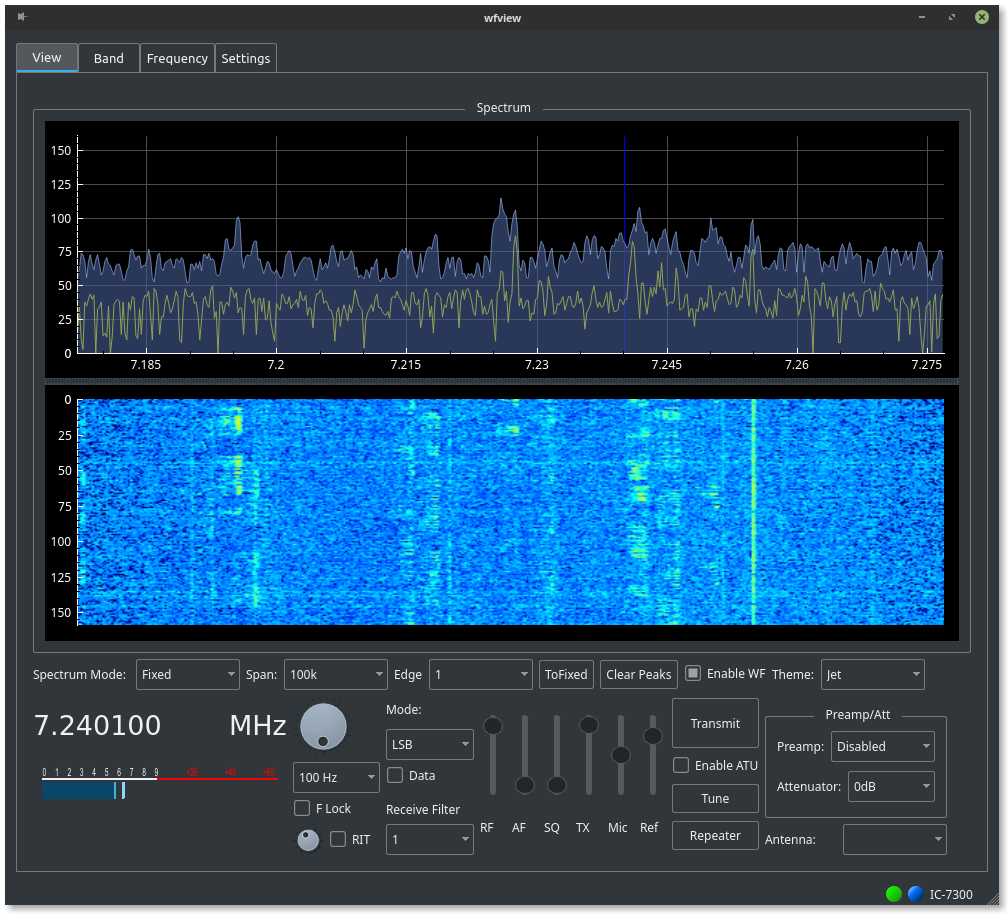
The Spectrum and Waterfall:
The top visual section is the spectrum plot. This plot shows the intensity of signals at each frequency. There is also a “peak” plot behind the main plot, which holds the highest signal level received at a given frequency. The blue vertical line shows the tuned frequency.
The lower section is a waterfall display, showing the “history” of signals received. In the middle, between the two plots, is a divider that may be dragged up and down.
Using the scroll wheel in either plot tunes the radio per the selected tuning step. Holding shift divides the tuning step by ten, and holding control multiplies the tuning step by ten.
Clicking within either plot reports the clicked frequency to the status bar at the bottom of the window. Double-clicking causes the radio to tune to the selected frequency.
Spectrum controls:
- Spectrum Mode: Select the desired mode, either Fixed or Center. For rigs with updated firmware, Scroll-C and Scroll-F are also available.
- Span: This selects the span, to the left and right, of the center frequency.
- Edge: Selects the edge. Rigs with updated firmware support four edge presets.
- ToFixed: When you press this button, the currently shown range of spectrum is placed into the currently selected Edge, thus creating a fixed range from the current centered range. This is useful when you want to change frequencies and don’t want the spectrum display to slide. Keep in mind this will override whatever edge is currently programmed in the selected edge slot. Once you are comfortable with this feature, it will become second nature.
- Clear Peaks: This button clears the held peaks. The peaks also automatically clear whenever the spectrum range changes.
- Enable WF: This control toggles the spectrum plot and waterfall data on and off at the rig. Use this if you need “quieter” CI-V traffic or need lower bandwidth on the graphics. This control is also useful to “hold” the current display if you wish to take a screenshot of an interesting signal.
- Theme: this combo box is a menu of preset color themes for the waterfall display. The themes come from the plotting library, QCustomPlot, and are not currently editable (though that may change).
The S-Meter:
This meter shows the instantaneous signal level of the received signal, as well as a peak value (bright line) and an average (thin blue line). The polling rate is 10ms. During transmit, the meter shows transmit power (watts), however, at this time, the scale does not change to reflect the transmit units (this will be done with future version of wfview).
The Frequency controls:
The frequency controls include a tuning knob, tuning step selection combo box, frequency lock, and RIT.
- Tuning Knob: This knob may be either “turned” with the mouse button, or, operated using the scroll wheel of the mouse when the mouse is over the knob. Tuning steps are as selected in the tuning step combo box, and can be modified with control or shift to select ten times wider steps or ten times smaller steps, respectively.
- Tuning Steps: The tuning steps combo box provides many common tuning steps to select between. Keep in mind that there is an option under Settings to automatically round the frequency to the nearest tuning step.
- F Lock: Locks the frequency tuning controls of wfview. This does not lock the controls at the rig, and in fact, the rig’s frequency lock control doesn’t lock the controls of wfview. Thus, they are independently lockable.
- RIT: Receive Incremental Tuning: Use this control to specify a receive-only offset, often useful for tuning in stations on sideband that may be slightly off-frequency. The RIT checkbox must be checked to use the knob. The RIT range is programmed to allow for +/- 500 Hz.
Mode and Receive Filter:
Controls in this section allow for the selection of various modes and receive filters.
- Mode: This combo box allows the user to select from the available modes on the radio.
- Data: This checkbox toggles “data” mode on the radio, which is generally used to toggle between different modulation inputs and receive filters.
- Receive Filter: Use this combo box to pick between the rig’s three receive filter presets. (Future version of wfview will allow the user to adjust these presets.)
Slider Adjustments:
These controls adjust the radio’s various level parameters. The names are short so as to allow the controls to be close together, however, there is generally useful mouse-over help text.
- RF: This control adjusts the receiver’s RF Gain.
- AF: For USB-connected radios, this control adjusts the rig’s speaker volume. For LAN-connected radios, this control adjusts the local computer’s receive volume.
- SQ: Receiver Squelch.
- TX: Transmit power. Keep in mind that some radios have different power levels for each band, so you may need to bump this control as you change bands. Future version of wfview will be more aware of this level and track it as the bands change.
- Mic: This slider adjusts the transmit (modulation) audio level. The name of the slider changes depending upon what input source is selected under the Settings tab.
- Ref: This slider adjusts the reference level for the spectrum display.
Transmit and Receive (PTT):
The “Transmit” button keys the transmitter. Once the transmitter sends wfview confirmation that it is keyed, the button changes to a receive button with “Receive” as the text. It is similar to a latching PTT, just as the radio has on the front panel. The keyboard commands Control-R (receive) and Copntrol-T (transmit) are always available. Additionally, in QSO, if you have last clicked the Transmit button, then pressing the space bar will generally press the button again (the button retains focus). Keep in mind that the PTT must be enabled on the Settings tab (it is disabled by default). There are also dedicated PTT ON and PTT OFF buttons under settings, in case there becomes a need to manually send either command (as opposed to the toggle action of this main button). It’s also worth noting that wfview has a 5 minute timer on transmit time. If you hit the 5 minute mark, wfview will return the rig to receive mode automatically. This is just to help you in case your cat sits on the space bar of your computer while you’re out getting coffee.
Antenna Tuner Unit (ATU):
For rigs equiped with either an internal ATU or an attached compatible ATU, the following controls apply:
- Enable ATU: Enables the ATU.
- Tune: Runs the ATU’s tuning cycle. wfview will probe the rig for tuner status, so watch the status bar in the program to see if the tuning is successful. If not successful, the ATU enabled checkbox is unchecked.
Repeater Button:
The “Repeater” button brings up a dialog box with controls needed to operate repeaters, including PL tone, Tone Squelch, DCS/DTCS, and Offset. Of course, some of these controls can be useful for dedicated receivers, and they all can be used for simplex and split operation.

Repeater Duplex:
These controls toggle the duplex of the radio. The “Auto” option uses the automatic mode (generally only correct in the US). Keep in mind that with the Auto selection, the rig won’t compute an automatic offset until the frequency is changed. Note, Icom uses “DTCS” as their DCS name. This is probably done to lower confusion with the DD/DV mode digital squelch.
Repeater Tone Type:
This is the selection for the type of tone to be transmitted and/or received:
- None: No tone transmitted, and no tone required for receive
- Transmit Tone only: Transmit the selected PL tone. No tonesquelch.
- Tone Squelch: Transmit the selected PL tone, and also, require this tone for the tonesquelch. There is no provision currently for mismatched tones.
- DTCS: Digital Continuous Squelch (“DCS”). This enables transmitting a DCS code as well as a DCS squelch. There is no provision currently for mismatched tones.
Tone Selection:
- Tone: Use this to select the PL tone. Once clicked, arrow keys can be used to rapidly try different tones as a sort of “tone scanner”. Tones can also be typed in once the menu is clicked.
- DTCS: Use this control to select the DCS tone.
- Invert Tx and Invert Rx: These controls invert their respective DCS tones. Most systems do not require these to be checked.
Preamp and Attenuator:
For rigs with built-in attenuators and preamps, these selection boxes allow for selection. Keep in mind, some rigs do not allow preamp and attenuator at the same time, and so, you may see one selection changing in response to another. For these controls, wfview simply sends the command and then checks the status of both parameters, following the rig’s status closely.
Antenna Selection:
For radios with multiple antenna options, this combo box allows the current antenna to change. This combo box is not sufficient for the IC-7850/IC-7851, as this radio allows for more complicated arrangements, but may be sufficient for other radios. Future version of wfview will include more options for this selection.
Status Bar:
The status bar shows two “LEDs”, the rig connected, and any useful status messages. The LEDs indicate PTT status (green for receive, red for transmit — this is the LED on the left), and rig connectivity (blue means connected).