This page tells how to set up a simple remote server so that radios without network access can be used remotely. A popular radio for this purpose is the IC-7300, but other radios from Icom will work just as well.
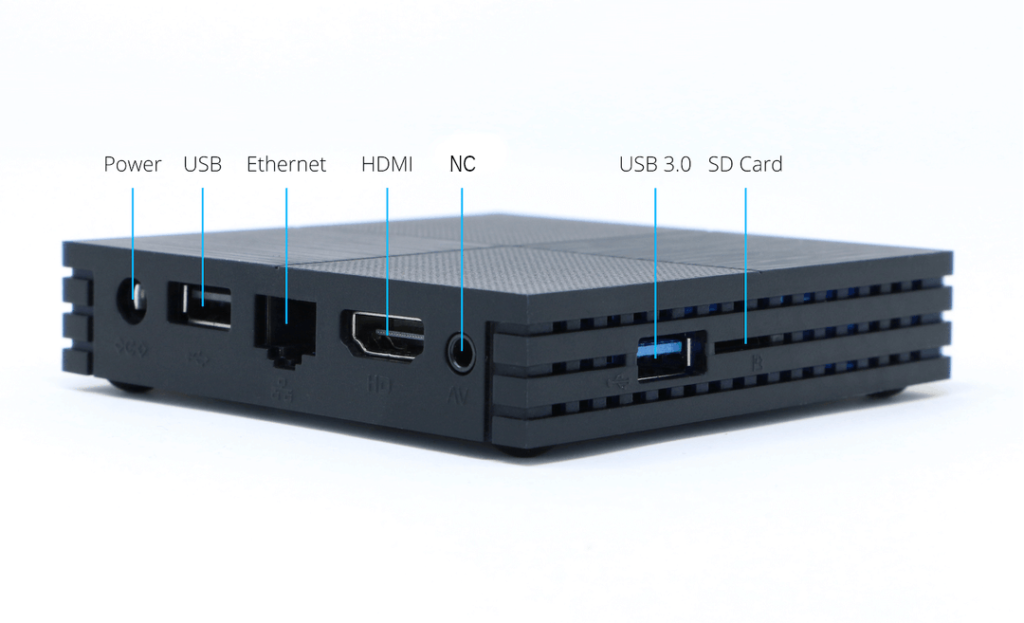
For this how-to, I will be using the $35 Inovato Quadra. A Raspberry Pi 3, Orange Pi, or any modern SBC (“single-board computer”) should work fine as well. The Quadra comes with built-in storage and a case, so you do not need to buy those things. The included power supply is not appropriate for ham radio as it makes hash all throughout the HF bands (ask me how I know…). However, in testing, I observed that the maximum current on the 5V supply was about 812mA, briefly during booting, and that at idle the current is only 235mA (with the desktop open and wfview running). There are many low-noise supplies which can support this SBC at these low currents. A 7805 regulator may even be sufficient (with heatsink and capacitors of course).
You should start by reading our server setup page to get the idea of what we’re about to do. The process is very similar, but we will be using a small and dedicated computer instead of a normal desktop. You will need to be comfortable editing files and running commands in the terminal. Familiarity with network setup is a must.
You will need cables to connect your radio using the USB port. Many radios, like the IC-7300, have a built-in USB port, and for that radio you just need a USB cable. For older radios, you will need something like a RigBlaster or XGG Comms adapter. Adapters with transformer isolation are recommended.
Operating System Configuration
The Quadra comes with armbian, which is a Linux operating system based on Debian Bullseye. The Raspberry Pi also runs a debian-based distribution. Any Debian-like system should be fine.
Start with the usual. Change the default password (change it for both the root user and the quadra user — make sure to do both!) and make sure the network access is solid. I used ethernet for my setup as it is definitely ideal for streaming service such as this. Also, on some platforms the WiFi over USB causes issues with how we stream over USB. Therefore, use Ethernet if at all possible. Optionally run a system update and reboot. ssh is enabled out of the box on port 22.
With armbian, I had to remove brltty to stop it from stealing the serial port of the radio. If you don’t do this, you won’t see the serial CI-V device! Some systems may also require removal of the ModemManager.
sudo apt-get remove brltty
sudo apt-get remove modemmanager
Reboot once that is complete. I also added x11vnc so that I could easily remotely view the display. You can do this entire tutorial using ssh and ssh with x11vnc if you wish, or you can sit at the SBC and do it that way. Either way though, this utility is quite handy. You can ssh to the box and run x11vnc, and then connect over VNC to see the local display. If the machine is stuck at the login manager, then you need to run it as sudo with the “-auth guess” argument. Install x11vnc like this:
sudo apt-get install x11vnc
I configured the machine to automatically log in the primary user. If you switch later to the non-graphical wfserver version, you won’t need to do this, but for now it’s quite simple and effective.
I followed this guide to configure the machine for automatic login. Here’s the change to make:
Add the following two lines to /etc/lightdm/lightdm.conf.d/11-armbian.conf:
autologin-user=quadra
autologin-user-timeout=0
Note, on the Raspberry Pi, this file will have a different name.
Installing wfview
Installing wfview is simple. You can use our installer script to automate the entire process, including installing dependencies, compiling, and installing the binary. Follow the directions carefully, and watch the video if you have questions. One thing you will need to change (before you run the script) in the script is to cause the build process to use only one core. This prevents smaller computers like the Raspberry Pi and Quadra from overheating or over-currenting. You can actually skip this step, however, the computer will reach 64C, so maybe it’s worth doing. Edit the script using your favorite text editor, and change this line (approximately line 159):
time make -j2
to this:
time make
Then run the script. The build process took about 15 minutes on my Quadra. Once installed, you can find wfview under the Applications menu in the “Internet” category.
Configure wfview
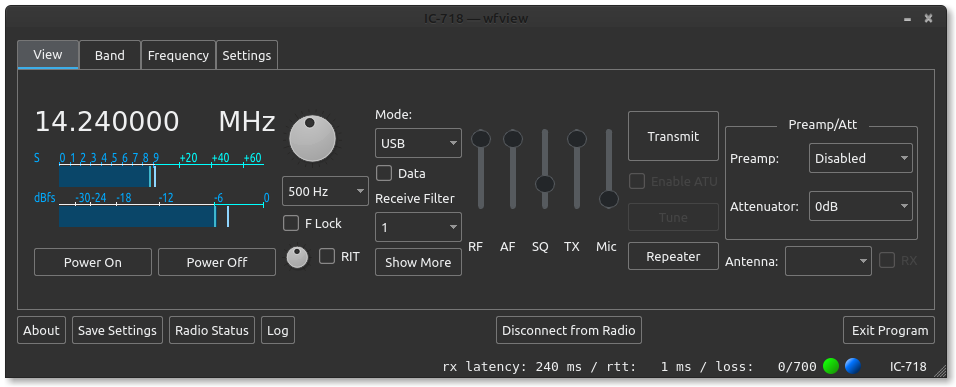
This part is simple. Connect the radio. Open wfview. Configure the access to the radio under Radio Access. Be sure to select the serial port (it should be /dev/ttyUSB0). Enable “Use RTS for PTT” if your radio needs it (many older ones do. The 7300 does not.) Configure the baud rate. Turn on CI-V Transceive on the radio, and make a note of the radio’s CI-V address. Newer radios, like the IC-7100, IC-718, etc, respond to our CI-V bus query and identify themselves. Older radios will need the address manually specified. Press “Connect” once you have the settings in. Be sure to press “Save Settings” once you get it configured successfully.
Under “Radio Server”, check the box to turn on the radio server, and then press “Disconnect” to disconnect from the radio. Define a user account. Select “Qt Audio” as the audio system. Select your RX and TX audio sources. Make a note of the three ports listed above (by default, 50001, 50002, and 50003).
Under “User Interface”, set the polling to manual and 250ms interval. This will keep the server side from polling the radio to death. Since the server and client do not sync their polling, sometimes you can have issues with older radios that have slower internal CPUs. The client side polling can remain automatic (20-75ms).
Press “Save Settings”, and then press “Connect to radio”. Check the Log to make sure the audio devices were used properly.
Additional System Configuration
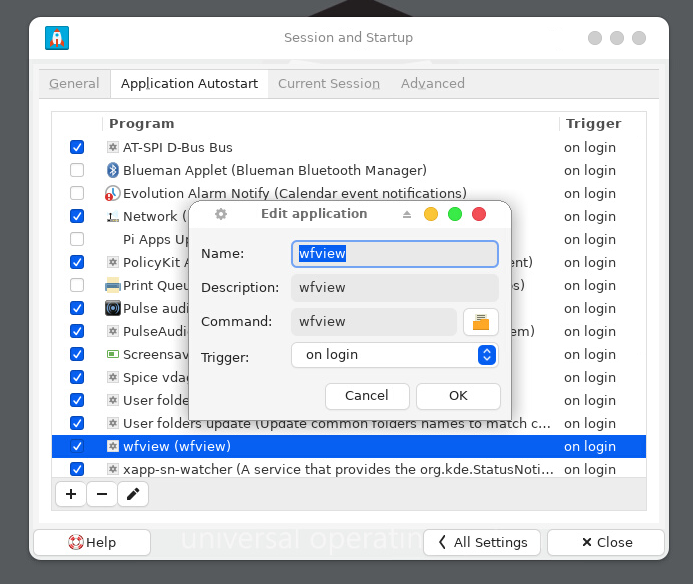
Open the “Settings Manager” of xfce. It looks like a set of switches in the dock widget at the bottom of the screen. Scroll down to “Session and Startup” (look for the rocket ship icon). Then go under “Application Autostart” and add wfview as a startup application. You can also uncheck Bluetooth and Evolution Alarm Notifier if you don’t need those things. For the Raspberry Pi, follow this guide for starting a graphical program on login.
Tune the radio to an active station. Connect to your wfview server using a client-side wfview instance. On the client, set the secondary meter to “TxRxAudio” (Settings, User Interface, Secondary Meter).
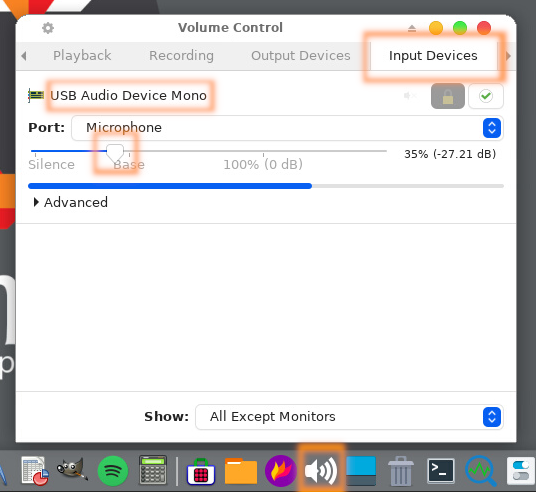
Set the audio level from the radio’s receiver into the computer by using the Volume widget in the dock on the server. Click the speaker icon and then select “Audio mixer…”. Now click the tab “Input Devices”. If you do not click this tab, then you will be scaling the audio and not adjusting the analog level at the converter. So don’t forget! Under input devices, you should see something like “USB Audio Device”. Use the slider to adjust the level until there isn’t any distortion. I like to see levels peaking at -6dB fs. I don’t know how to configure this to save the gain setting, sometimes it seems to on its own and other times it doesn’t.
Final Thoughts
On my system, wfview uses less than 1% when there isn’t an active connection. This is with my IC-718, mind you. If you are doing this with a 7300, it will be higher due to the server drawing the spectrum. It’s worth a shot to configure wfserver once you have a working configuration file. wfserver does not have any tool to help you configure anything, it’s purely command-line and without any user interaction. But, it understands the same configuration file.
When a user connects, I see that the total CPU usage jumps to 11% (and I’m using the opus codec, which should be higher than the PCM and uLaw options). The CPU temperature is generally around 46C, and I have not added a fan or anything to help with the thermal environment. I am seeing that the CPU idles at 480 MHz, and it will jump to 1704 MHz and then down to 720 MHz when a client connects to wfview. You can check using sudo armbianmonitor -m.
On storage, the quadra arrived with 8.8 GB available and it’s down to 8.7 GB available with wfview installed. This is nice, the default image included a lot of the usual tools and libraries and still has plenty of space. htop shows memory usage is “490M/1.94G”, and wfview us using 4.6% of that.
Overall what this means is that the computer isn’t overly taxed. It can handle this task easily.
I remotely accessed my IC-718 using the Opus codec over my cellular hot spot from the park recently. Audio was smooth and control was consistently responsive. I did need to run the latency up a bit higher, around 250ms seemed to be good.